Wednesday, May 29, 2013

Boxed Gift Card Set...

Are you ready for another 3D project from me? I had been wanting to use the Lori Whitlock file for A2 cards from the Silhouette store since I saw it. What a great gift to give a pretty box that holds several A2 cards. I plan to do a bunch of these for Christmas gifts this year. Here's how I made mine.


I love how this little box came out! I used several stamps and dies from My Creative Time and I will have links to all at the end of this post. The paper is from my stack for a Project Life. I love black and bright pink!


I added some chunky glitter to the edges of the rose and popped it up with dimensionals onto the scallop circle dies, and that is on the vintage label die. For the ribbon, I cut three different lengths of ribbon, gradually shorter, made loops, and then stacked them up and wrapped a short little piece around the center. I wrapped another piece around the front of the box and then used hot glue to adhere the bow.


Here's a better view of how the boxes slide together. I had punched a half circle on the outside box to better be able to grab hold to slide apart...that's why you see a half circle in pink.

Here's the cards I made for the inside.


To create the scalloped piece, I used the Scallop & Stitched Circle Dies, and then made a larger piece using a Stampin' Up scallop punch and then chose one of my Nestabilities circle dies that fit the best. Same thing for the front of the box. I also chose a delicate embossing folder to do the pink background piece on the front of the cards. For the tag, I layered one on top of the other, then snipped off the end of the bottom tag so it had a straight end. Added dimensionals to adhere.

You could make birthday cards, get well, sympathy, anniversary...anything! How nice to get a gift with an assortment of cards to meet any need. Who wouldn't love a gift like this!

Here's the supplies I used on this project.

 So, that's it. Have fun crafting and I'd love to see if any of you do something similar. I know my family will love these as gifts...and yours will too!


Friday, May 17, 2013

Summer time Ice cream time...

Summer time is just around the corner!!! Yahoo! It has been so nice here in Ohio the past few days, and it made me want to make a super cute Summer card. So, here it is.


I LOVE this paper collection from Carta Bella....screams summer! I used a Shaplie file from Penny Duncan to make the shaped card. In my Silhouette software I messed with the sentiment and check out how small it cute those words....love my Cameo! I esp love it for Print2Cut...it's always spot on.


I used some dimensionals to pop up the ice cream cone and the word Summer. All the other little words I simply glued down. I tied twine onto the button, and used hot glue to adhere. And of course, some white gel pen!


Here's how I finished off the inside of the card. That little stamp from My Creative Time fits this card perfectly! Love those stamps!

So, there you have it. Here is what I used to make this card.


I hope you like my card for today. Visit these sites and get some for yourself, and have fun crafting!


Thursday, May 16, 2013

Celebrate...

Here's a card I made using my fave products. Stamps and dies from My Creative Time and cut files called Shaplies from Penny Duncan....they are cut files just like Nestabilities. She has them in her Etsy store and I will have a link at the end of this post. 


This must be one of my fave color palettes! I LOVE teal and anything that goes with it...but this is so pretty to me. I took different sizes of the postage stamp file and welded for the card base and smaller ones for the top layer. I used my Cameo and the Silhouette software, and for the top layer I created an offset layer that is cut in the teal color. I ran the top layer through my Big Shot using the Swiss Dots embossing folder. I added dimensionals to add more interest.


I used some of Miss Emma's flower dies and leaf dies to make these pretty flowers. I added centers cut with the button dies. Clustered them together and glued down...one has a dimensional under it. I love how they look!


To create the sentiment I used one banner die from the Chocolate Greetings set and the bottom layer is from the Vintage Label set...again, I will have links at the end. I stamped with Hero Arts Shadow Ink using a stamp set from the latest release. I added dimensionals and tucked it under the ribbon. 

So there you have it...a really pretty card! Here's what I used.


Thanks for stopping by! Hope you got a bit of inspiration. Happy Crafting!


Wednesday, May 15, 2013

Keep out the bugs...


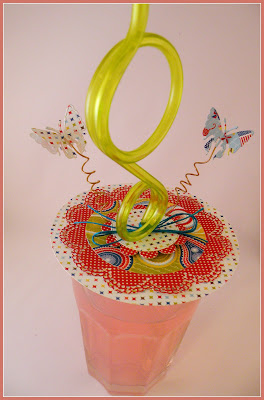
 Do you ever get tired of bugs getting into your drink when having a picnic or sitting by the pool in the summer time? I do!!! I saw something like this on Pinterest last year and made some, and thought I'd do some others and share them with you. Super easy and you can customize them for any theme. If you treat them with care, I suppose you could reuse them. So, here's my drink lid.


I cut a 4 inch circle on my cutting machine first off. Then I cut some designer paper with the doily die from MCT. Then I cut another circle using my Nestabilities and picked one that fit the center of the doily the best. On top of that I cut the scallop and stitched circle dies. 

First I centered the scallop/circle...the top pieces...centered them, and used my eyelet setter and cut the hole right in the center. Then I laid those, centered over the next larger circle, and punched another hole. Repeat this till all holes are cut, right in the centers of ever layer.

I added foam dimensionals under the scallop/circle layer on the very top. Attached that to the next layer down.  All of the other layers are just glued down, no dimensionals. 


I cut out a few of the butterflies using the die. I coiled a bit of wire and hot glued it under the edge of the scallop/circle piece...the top layer. I also used hot glue to attach the butterflies to the wire. I used two and sandwiched the wire in between.  I stretched the wire out a bit to let them "fly". I also tied a bit of hemp around the straw. 

Here's a pic without the straw so you can get a look at how I made it. Hopefully it gives you a better look.


I hope you like these and will give them a try. Would be super cute to do stars and stripes and a patriotic theme for your July 4th picnic! Your guests will love them, and you can even send them home as picnic favors! Pick your theme and run with it.

Here's what I used to make these.

Nestabilities or Circle cutter

So, there you have it. Gather up your supplies and make some cute drink lids of your own. Your guests will talk about them long after and comment how nice it was not to have to bat the bees out of their lemonade! Happy crafting!


Friday, May 10, 2013

Birthday Bash Blog Hop...


BIRTHDAY GIVE AWAY ALERT!

How would YOU like to be the LUCKY winner of this FABULOUS  “Project Life COMPLETE Scrapbook Kit BLUSH EDITION”?  Yep, Miss Emma had ordered an extra one to giveaway for this special day! ;)  All you have to do is leave a comment at EACH stop in this hop!  For additional entries you can spread the word on facebook to all of YOUR friends! Once you do that, go ahead & visit my facebook page HERE & let me know that you did so!  This is a FABULOUS prize so "Good Luck!"
***SALE ALERT***
Okay, are you all ready for an AMAZING sale as well? For THIS WEEKEND ONLY, please use this code: BDAY42  at checkout to get 20% off of your purchase! You can start shopping HERE! This sale will end on Sunday, May 12th at midnight PST!  As a Birthday present from ME to all of YOU, I am giving away this ADORABLE stamp set to orders placed THIS WEEKEND ONLY! There is a $20 minimum order required to receive free stamp set!


First off I want to wish Miss Emma a very Happy Birthday!!!
So, here's my project for the Birthday Bash Blog Hop. I've been liking the look of the Clean & Simple card design lately. I did one for the new release. I wanted to do another...but maybe not quite as clean and simple...I kept adding...lol. For the background of the card, I did all stamping. Line, sentiment, line, sentiment...using a variety of bright ink colors. 


I like how it came out, and I will try this again with something different. I used the journaling die from the newest release...love this die! I then used the layering tag die, the flower die, and the leaves die. I did several layers of the flower head and used dimensional adhesive to give some depth. I also inked the edges a bit. Added a few gems to the corners and tied some ribbon.  For the sentiment, I stamped it and hand cut the flag edge. I layered it with dimensionals onto the yellow paper and then cut that edge to match the top layer.


For the little treat box, I layered several of the flowers again. I used one of the Build A Banner tag dies for the sentiment and tied it around the top. You can fill this with some treats and give it with your card. Could be any sentiment, fill with goodies and bless someone with a little goodie.


Here's the last pic of my birthday combo. I love these colors...screams Spring/Summer to me. Use whatever papers you have in your stash for any occasion. The sky is the limit using this little treat box.
So, here's what I used to create this.

Bubblegum Treat Box Die
Stitched Journal Die
Stitched Daisy Die
Stitched Leaves Dies
Just Tags Stamp Set
Build A Banner Kit
Wow So Many Candles Stamp Set
Many Greetings Stamp Set
Gift Card Sentiments Stamp Set

Now, on to the Birthday Bash Hop. Stop by all the designers pages and leave a comment for your chance to win the give away from Miss Emma! I KNOW that you will see tons of cute ideas! We all make/need Birthday cards and or gifts, so this hop should give you lots of inspiration. Have fun hopping!

Wednesday, May 1, 2013

A picnic lunch...


Hey guys....it's 3D Wednesday again. I love making anything paper, but I really like making 3D projects. They are my fave! So...I have a super cute picnic basket to show you today. You could actually pack a little lunch in here and bring to that special someone. How cute would that be?!


Told ya! Isn't it cute? This is a file from one of the newer sets over at SVGCuts. I love this little box! So super cute...and very easy to assemble. I used AC cardstock for the main box and then I printed some digital papers by Lori Whitlock called Lazy Summer Day paper collection I got from Jessica Sprague. 


For today's 3D project we had to use at least 3 flowers. So, here's my 3 flowers. I love them...they came out so cute! I used dies from MCT for the flowers and leaves, and for the smaller flower centers I used my Epiphany Crafts Shape tool and added the clear bubbles to the top, then glued them in to the centers of the flowers.


Here is another element I made using a frame die, another flower, and another Epiphany Shape Tool clear button...on the silverware. I masked off a stamp to only get the word Enjoy and stamped it on another die cut piece. I tied it to the frame with some jute from Liz's Paper Loft Boutique. I attached it to the box with dimensional adhesive. I cut the frame twice in different papers because I wanted the center to be the patterned paper. I taped it in place on the backside of the frame edges.


Here's a shot of the basket open. Each side lifts up for easily adding your goodies to the inside. This would even be cute decorated with a birthday theme for bringing a special birthday lunch to your child at school. Super cute idea!

I hope you like my picnic basket today. If you'd like to make one of these yourself, here's what you will need.


So, there you have it. That is the list of what I used on my project. You can substitute what you already have and be able to make a super cute picnic basket of your own. Whatever you use, have fun...put your own spin on it. Paper crafting should be fun! Happy Crafting!