Friday, August 31, 2018

Thank You Tag And Pocket

Hey crafty friends, Cheryl here today for a post for InkOn3.

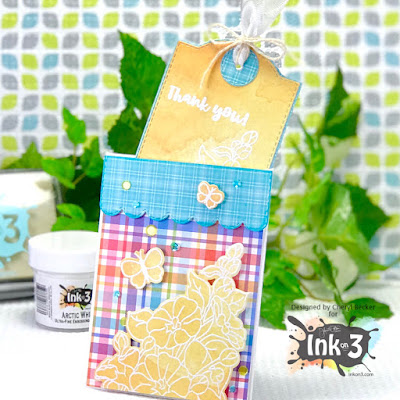
I made a fun tag good for any reason. I made a thank you tag. You could tie it on a goodie bag or attach it to a card base. Tags are so fun and good for any occasion.


I pulled out a pocket die I have in my stash from My Creative Time. It's such a fun pocket and the tags fit perfectly. I cut it first from white heavy weight cardstock and then from some lighter weight patterned paper from Lawn Fawn. I then glued it to the white base.

I then stamped my image onto patterned paper and white heat embossed using Juicy embossing ink and Arctic White embossing powder from InkOn3. I then used the coordinating dies and cut out one of the florals and the little butterflies. 
For the tag, I first die cut it and then stamped and embossed.


For the tag, I first die cut it and then stamped and embossed. Again using Juicy ink and Arctic White embossing powder. I layered the top layer onto the bottom one and then added the reinforcement circle. I also cut one in plain white paper and attached to the back for a place to write your note.


I stamped a thank you sentiment and embossed it as well. 

So that's it. Super easy but super cute and can be made for any occasion or holiday. The sky is the limit on something like this.

Here's the shopping list.

Studio Katia - Crystals
Lawn Fawn - Patterned Paper

So that's it. Get out your supplies and craft up your own designs. I hope that this gives you a few ideas!
Happy Crafting




Tuesday, August 14, 2018

InkOn3 Embossing Powders Blog Hop

Hey Crafter! Let's hop, shall we?


Today is a new exciting product release! EMBOSSING POWDERS!!!
Yep, that's right. And they are amazing! Super fine, no added waxes or fillers, and they melt amazing!

Arctic White
Chrome
Gold Rush

Let me show you what I did using the Chrome.


I used the Dogwood Flower stamp set to create a frame around a 4 x 4 piece of cardstock. I stamped using the Juicy ink and added the Chrome embossing powder and melted it. This is a fabulous silver! It is so shiny and you have got to see it in person. Photos and descriptions don't do it justice.


I also created a matching envelope using the Envelope Punch Board from We Are Memory Keepers. The directions are on the board for the size envelope you wanna make. 
I then die cut a label using a die from my Spellbinders stash. I stamped the sentiment and embossed again using the Chrome. I cut a second label from silver glitter paper, cut it in half, and attached it so the two ends show the glitter.
I attached the 4 inch square panel to a 4.25 x 4.25 card base using foam tape. I then added the label, also with foam tape.


I tried my best to capture the shine. This shows a bit. It's hard on white but I wanted this to look really clean. I added a few crystal gems to the front and I brushed my Spectrum Noir sparkle brush into all the flowers. The sparkle is amazing! You gotta try this powder so you can see for yourself!

Here is the blog hop line up.


Comment on each blog post to be entered to win one $25 InkOn3 shopping spree! Giveaway will close on August 19th at noon CST and winners will be posted on the InkOn3 blog!

Grab all three Ultra-Fine powders and save 20%. This week only! Use coupon code bosshop20. You will save 20@ on all new powders and our inks!

Here's where you can get the products used in this project and so much more!

InkOn3
Juicy Ink
Dogwood Flowers Stamp Set
Chrome Embossing Powder
Arctic White Embossing Powder
Gold Rush Embossing Powder
Studio Katia Crystals
Envelope Punch Board
Spectrum Noir Sparkle Brush Pen

Have fun hopping and get your craft on!


Tuesday, August 7, 2018

Brand New Product Showcase

Welcome!
Today we are showcasing a brand new product from InkOn3!!!
How exciting is that??? Any guesses?
Well...IT'S EMBOSSING POWDERS!!!
Yes, and they're amazing, too. 


 This is amazing powder. It's milled to ultra fine and no added waxes or fillers. It is the finest I've used! You are gonna love it!
So, here's what I did using the Arctic White and the Gold Rush powders.


I have some widow sheets that you can emboss on. So I used my anti static powder very liberally!!! I then stamped my image with Juicy ink and poured on the Artic White powder. And then used my heat tool to melt it. Keep your tool moving or the acetate will warp.

 Then I choose to use a white woodgrain paper for my card front. I used the coordinating die for the floral stamp and cut it in the center of the card front. Next, I aligned the embossed acetate so it fit right in. I had already added double sided tape to the back of the card front so it would stick right in place. I then used a double layer of foam tape all around the window to fill with sequins.


I wanted to totally fill the space so that all you would see is the sequins making the color of the flower. I chose shades of purples. I then closed up the back with some purple cardstock to carry on that color.
I cut a strip of vellum and stamped the sentiment after prepping with my anti static powder. I poured on the Gold Rush embossing powder and melted with my heat tool. I backed it with the same purple cardstock and wrapped the edges behind the card front.
I finished off with a few sequins and attached the card front to an A2 card base of heavyweight white cardstock.

So, there you have it. This embossing powder is fantastic and I know you will love it. It melts so smooth! And the white is VERY white! And the Chrome??? Well, it's my favorite!

Here's where you can get these items.


Head on over and check out the store. Fleurette has such cute stuff. And the inks are great! And you will love these new powders.

Happy Crafting!