Sunday, September 17, 2017

Grateful


Hey my friends, Cheryl again today, with another card project for you. Today's card is mostly just dies and patterned paper. Added one tiny stamp and a few sequins. So, let's get to it.
I have used the KS Never Ending Dies and the new KS Border Dies. And I also took advantage of some of the cute images in my patterned paper pad. I love to use them, everything coordinates, and they are quick and easy cards. You could whip some out really fast. The papers I used are from Authentique, called Bountiful.


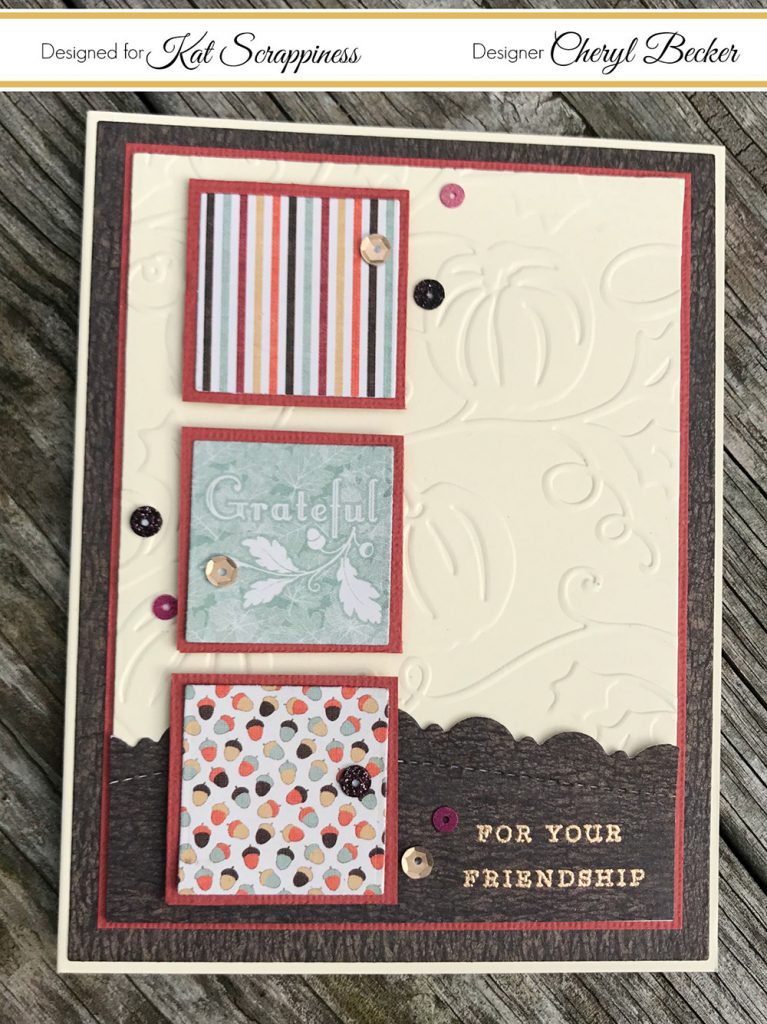
I used the KS Never Ending Dies to cut the dark patterned paper in the background and also to cut the patterned paper squares. I cut the ivory cardstock and used a fall embossing folder. I matted each of the squares and the ivory piece on rust colored cardstock, for a pop of color. I also cut a piece of the dark brown patterned paper and used the KS Fancy Scalloped Border Dies on the top edge. I chose a sentiment from Hero Arts Thank You Messages and embossed it with gold embossing powder.


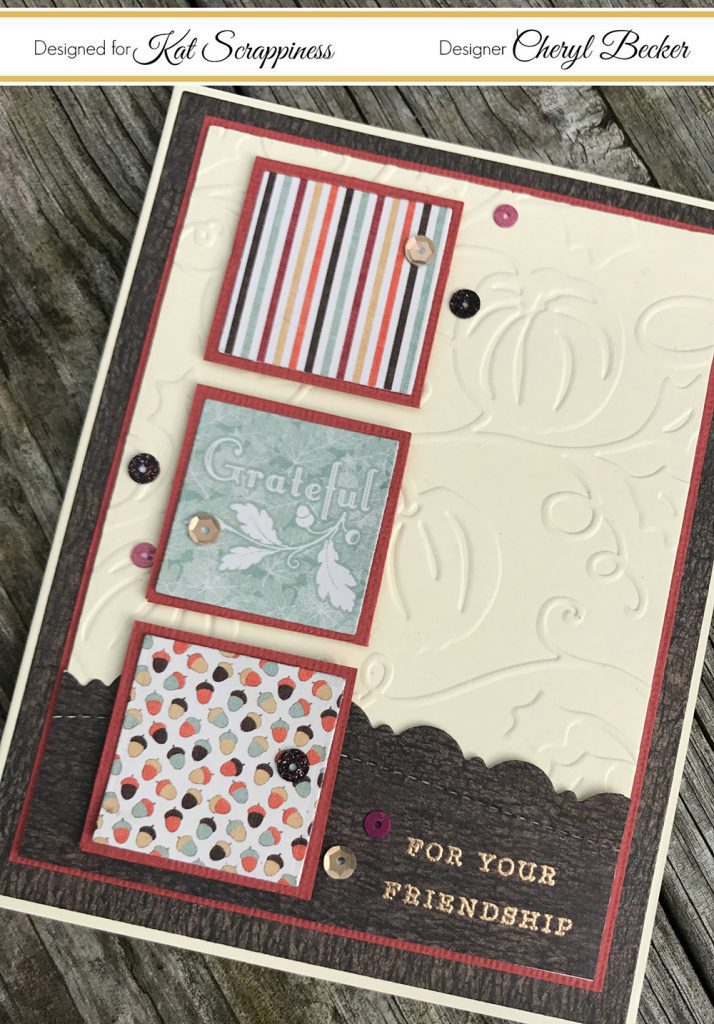
I used foam tape on the back side of the squares and spaced them out evenly from top to bottom. I then added the entire panel to an A2 piece of ivory cardstock. I chose some sequins from KS Sangria Masquerade Sequin Mix, scattered them around and glued in place using liquid glue.
So that's it. Easy and yet cute. No one says a nice card has to take a long time to make, and these elements included in paper pads are great to use! Hope you got a bit of inspiration. Here's where you can find these products and many more.

DON'T FORGET to use the coupon Cheryl10 to get 10% off your order! Get out your supplies and have fun crafting!

Wednesday, September 6, 2017

You Are Blessed


Hey fellow crafters, Cheryl, here today. I have a card to share using some of Kat's dies in different ways. So, let's get started.


To begin, I took one of the new border dies and cut a bunch. I then arranged them on an ivory colored piece of cardstock, rotating them to create a fun pattern. I filled the entire piece this way. Then I took a rectangle die and cut that entire piece with pretty stitching all around.
I then chose three colors of cardstock and die cut two sizes of the scalloped circles and inked the edges. I wanted to create flowers using these die cuts and this is how I did it. Cut a wedge out of each, add some liquid glue, overlap the edges, and hold till dry.
I then used hot glue to add the smaller flower to the center of the larger one. After doing them all, I added liquid glue and tiny glass beads to create flower centers. For the smaller blue flower, I kept one die cut as is and only cupped one, and then glued it to the flat one.
To create the leaves, I used a stencil and Distress Oxide Ink and ink blended the leaf pattern. I then used scissors and fussy cut a small piece to get the leaves for the flowers. I arranged them on the card panel and glued with liquid glue. I then used hot glue again and placed the flowers over the leaves.

I used one of Kat's word dies and cut four, stacked them using liquid glue to create the sentiment. I chose a stamp set to get the sub-sentiment, "You are", and stamped in black and cut a flag end. I added foam tape and arranged both to the card panel and adhered in place. I finished off the "Blessed" by putting Glossy Accents on top.

I added some liquid Nuvo drops and a few black sequins to finish of the panel. I then added the entire piece to an A2 card base. I hope my project gives you some ideas to use your dies in a little different way. Obviously, this probably isn't a card you would be able to mail, unless in a small box or in a box with the gift. Or hand deliver with some treats or a present. You could also create some of these flowers using the larger dies and create a home decor piece and frame it to hang.
Here's the products I used with links to Kathleen's store to do some shopping. Also, use the code Cheryl10 to get 10% off your order.
Happy Crafting, everyone! Thanks for coming by.
 
Save