Tuesday, December 29, 2009
Tuesday, December 22, 2009
Friday, October 2, 2009
Hat, Scarf, Mittens
My Hero

Designed by
Cheryl Becker
I made this card for my son who is in the process of joining the US Army. I gave this to him on the day he went to take his ASVAB test...giving him some extra support. Inside sentiment is ...My Son. I did lots of inking of edges and used my signo white gel pen for accents on the front. I am so proud of him and pray God's best for him in this endeavor and where ever God may lead him.
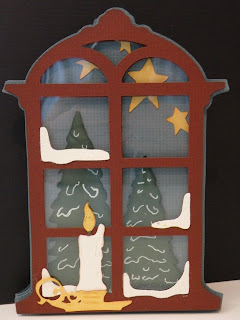
A View Out My Window

Designed by
Cheryl Becker
I use Design Studio to weld the shadow cut of this card for the base. Cut one more for the next layer. Cut one regular cut, layer of acetate and then another regular cut. The trees were skewed a bit to make them narrower...to fit a little better. They are adhered to the second layer, before the "window" is put on. Used a gel pen to highlight the accent marks made by the cricut. Added glitter to the accent snow pieces. The candle stick added the finishing touch on the outside of the card. Thanks for looking.
Saturday, September 26, 2009
Saturday, September 19, 2009
Circle Tags with Hallmark Card Studio

Created by
Cheryl Becker
I have Hallmark Card Studio Deluxe 2008
I start with a blank document and go to text to type what ever it is you want. Once you hit enter, there is a box to check for curved effect. From there you can make a full circle or a simple arch shape. Once you choose which one you want, you click on it and some "handles" will appear around your text. You need to play with pulling on those "handles" to make larger or smaller. You need to play around a bit to get the size right. Once you get this step down, you can add dots, dashes or solid circle. You can put clip art in the center or leave blank. Other than fooling around with those small gray box "handles", there is nothing else to learn. That is probably the hardest part. You just have to push and pull and drag them around. Good luck all.
Friday, September 11, 2009
Retro Snowflakes

Designed by
Cheryl Becker
I used Winter Woodland to make this card. I cut strips of coordinating card stock and did a weave with them. I cut one of the snowflakes at 3 different sizes. On the largest one, I cut the layers that went with it. I added some flat back pearls, did some inking, finished off the inside and called it done.
Saturday, August 29, 2009
Wild thing, you make my heart sing

Designed by
Cheryl Becker
This cute little owl was cut in Design Studio with Animal Kingdom. I welded two together for the card base. One more was cut to be the bottom layer. I used fiskars texture plates for the feather look. The "mask" was cut with Martha Stewart paper. I used my nestabilities to cut the centers of the eyes out as well as the scallop ring around the eyes. Cut one other mask layer in the aqua color and cut out just the beak. Did some inking and called it done.
Thursday, August 27, 2009
Fancy heart wedding card

Designed by
Cheryl Becker
This card was done in Design Studio using the heart from Home Decor. I welded two together in shadow blackout in black cardstock. I cut one additional for the bottom layer. I cut the top layer in red and stretched and skewed it a bit to get more red showing. The top layer is cut in white and run through the cuttlebug with divine swirls folder. "Love" is also cut from Home Decor with the shadow feature...a little thicker letters that way. I added lots of dots with my signo gel pen in silver, lots of flat back pearls and ribbon with silver edging. Thanks for looking.
Tuesday, August 25, 2009
Sunday, August 23, 2009
Saturday, August 22, 2009
Tuesday, August 18, 2009
Monday, August 17, 2009
Subscribe to:
Posts
(
Atom
)


