Friday, December 27, 2013

Bring on the New Year...

Happy New Year everyone!!! I hope this year brings only good things into our lives. We are ready for a "no drama" year!!! The end of the year brought great things and believing this new one will be even better!

Here is a simple card I made using some new digital papers by Fleurette Bloom. I used two of them and a couple files from the Silhouette store. 


I printed the two black and white papers by Fleurette Bloom and layered them with my fave ever glitter paper by American Crafts. I get mine at JoAnn's. I love how sparkly it is and so very, very smooth...and NO FLAKING OFF!!!


I found this sentiment in the Sil store, as well as the top hat. I just created another layer for the hat and cut it in the glitter paper. I also added some green gems. I put the hat on an action wobble. Those things are fun! It just wobbles, wobbles, wobbles! I also took a bit of twine to wrap around and tie a small bow.


As you can see, I layered another piece of the patterned paper on the inside and used a stamp from My Creative Time. It was perfect for the inside of this card. And so I say to each of you....
Cheers To A New Year!!!

Just a simple card, but thought you'd like it anyway. Head over to Fleurette Bloom and check out all her svg files and digital papers. You'll find something, I know you will! And don't forget about My Creative Time as well.

Here's what I used.


Happy Crafting and Happy New Year!


Monday, December 23, 2013

Glitzy Snowflake Shaker...

Here's a shaker card I made...always loved how Nikki Navy Wife made these, and finally got one to look right. I always had the stuff inside stick to the edges of my foam dimensional tape. This time I took a small brush with some baby powder and dabbed it on those exposed edges of the tape, and no sticking!!!

I cut the top from American Crafts glitter paper. Love that stuff!!! It is so sparkly and does not flake off!


I used on of My Creative Time's dies to cut the window mat. I used two layers of foam tape around the window area after adding acetate to make the window. I made a small pile of my sequins and glitter and carefully put down the window mat, centering as best as possible.

Next, I die cut several of the small snowflake from a Simon Says Stamp die using the same AC glitter paper. I also cut more of Fleurette's snowflake using my Cameo. Then I cut them in half and tucked around the edges, gluing down with tiny dots of glossy accents. 


So pretty! I also stamped my sentiment from a My Creative Time set and embossed with white embossing powder. Again I used a bit of Glossy Accents to glue down. I have some tiny holographic stickers from who knows where, and I scattered a few of those around for added sparkle. 

I hope you like my card. Check out the store at Fleurette Bloom for this snowflake and many other great files....svg files and digital papers!


So, there it is, a very pretty, very sparkly, very fun...shaker card. I hope you check out these products and create one of your own.

Friday, December 20, 2013

Farewell Blog Hop...

 "Welcome to our "Farewell Blog Hop"! We are doing this hop to HONOR & send off our "Current design team" in a fun way. Since all of us have become friends, we are doing our LAST blog hop together making it a "Friendship"  theme.  I hope all of "YOU" thoroughly enjoyed this team as much as we did! Since this is a special day, there will be a giveaway at EACH STOP! Yep, that means we are having a total of 19 giveaways! All you have to do is leave your comments in order to qualify! Emma will announce all the winners on Monday, 12/23//2013 on here blog! Here is what I am giving away today:


I have had the year of my life, working for Miss Emma with this awesome Design Team! It has truly been an honor, and I thank Emma from the bottom of my heart for this opportunity. And I thank you guys, for all the wonderful comments, for supporting and following my blog. It's been so much fun sharing my ideas with you, and getting ideas as well. This is an amazing group of women! Such talent!

Anyway....on to my last post...a card. Our theme was friendship....appropriate as this team really has become great friends. Friendships that will last long beyond the DT term. So, here's my card for you today.

 
I used the 4x6  journal die to cut the plaid paper mat. Then, I cut the red piece a 1/4 inch smaller used my atg to adhere. Then I came up with what I wanted it to say. I used the label font stamp set and stamped each letter in green ink. I cut each letter out and used foam dimensionals to adhere. I used my Wink of Stella glitter brush and went over each letter to get that great glitter. Love that thing...use it a lot!!!


My gingerbread banner represents each member of our team. Hand in hand, lol. I created a mat layer and offset it just a bit to show better. I also added it with some dimensionals. I have some glaze pens, and used the green and the clear one to add a bit of shine to the eyes, mouth, and buttons. It just needed something!


I chose my stamp and used white embossing powder to make it look better with the white on the gingerbread men. I mounted it on a bit of green cardstock.


For my finishing touches, I added white gel pen stitching all the way around, and tied some twine. Actually, the stitching was done first thing so it could dry while I worked on the other elements. 

I hope you like my card. Simple, but yet sends my feelings perfectly. I hope all of you guys who have followed me, will continue! I have loved reading all you kind words, Not going anywhere, I'll still be crafting, and I'll still post links of FB so you can see what I'm up to. I wish all of you the Merriest of Christmases and the Happiest of New Years! 

Here's what I used.


***SALE ALERT***
"There will be a sale in the My Creative Time store HERE FOR THIS WEEKEND ONLY starting Friday, December 20th & ENDS on Sunday, Dec 22 @ midnight PST!  
Use code:  FAREWELL2013 to get 25% off all IN STOCK ITEMS ONLY!!!

Your next step on the blog hop is Cindy.

Have fun hopping, and until next time....HAPPY CRAFTING!!!

Friday, December 6, 2013

5 Days of Christmas....Day 5

Well...today is the final day of our 5 Days of Christmas ideas for you. Wow....I'm blown away by the creativity of this team...and our awesome leader...Emma! Such cute projects this week, ladies!

For my project today, I created a little box using one of the large label dies. If you recall, the other week I make a small luminary with one of the smaller tags, and made a little box for the sides to adhere to. You can find it here. Well today I did something similar, just on a larger scale. 


Here it is! Cute, right? I love how it came out. If you look, you can see I used the large scallop tag die. I just cut it once, then rotated the die, lined it up just right, and ran it through to get the scallops on the opposite edge too. Then I cut a black mat, and a patterned paper layer, and adhered to the tag piece. I made two of those.
I created a simple box, scoring and folding, and gluing the flaps together. The just glue your decorative panels to that box.


Here is how I did mine. I used the ornament dies and covered them in glitter. I even took fine wire and bent in to look like ornament hangers. White embossed my sentiment and wrapped some twine. Used dimensional adhesive for added interest.


I added my candies and used the teeny tag dies with twine to tie the bag closed. So create the handle, I just cut a narrow strip in black and added a bit smaller strip of designer paper. I hot glued it on the inside and added a red pearl on the outside.


I made a simple bow by layering loops of burlap ribbon, glue them on top of each other, and then hot glue it to the handle. I tied on a couple of jingle bells on using the same twine.

Here's what I used.


So, there you have it. A simple little box can become very pretty when you add some of Emma's super cute products! I hope you had fun this week seeing all the cute projects. Hope to see some of your goodies too. Happy Crafting!

Wednesday, December 4, 2013

Five Days Of Christmas...Day 3

Over at My Creative Time we are doing 5 days of Christmas ideas for you. Hope you are getting some great ideas for some last minute gifts or treats or cards or decor. The sky is the limit when you use MCT products!

I made a pretty ornament for you today. Well, it's a sorta big ornament or it could be a little decor piece to hang in that perfect little spot. 

I used a svg cut file for the base of the snowflake and then, of course, jazzed it up with MCT products.


I used my favorite sparkly glitter paper from American Crafts.....LOVE that stuff! Anyway, I cut my top layer from that and the bottom layer is from some patterned paper.  


I used the large rosette die and cut my polka dot paper with it, and assembled. I use hot glue to glue it to a circle on the back to hold it in place. Then I hot glued it to the center of the snowflake. 

I also used the scallop and stitched circle dies. I stamped and embossed with white embossing powder, the sentiment in the center of the circle. It is from the new stamp set called A Day In December....love that set!!!

 
  I added foam dimensionals under the scallop but I also used hot glue to attach it to the snowflake. I don't want it coming off!!! How pretty is all that sparkle?!!! And it does not flake off....it isn't even rough like most glitter paper. Very smooth, and cut great in my Cameo, and didn't ruin my blade!

I love how this came out and you should really make some of these. Very easy to make, but a very impressive display. Anyone would love to receive one of these!!!

Here's what I used.

My Creative Time
Scallop & Stitched Circle Dies
Scallop Stitched Rosette Dies
A Day In December Stamp Set
SVGCuts - Snowflake file

I hope you like my project for  you today. Enjoy the rest of the week of ideas.and have fun crafting!


Friday, November 29, 2013

Black Friday Blog Hop...

HAPPY BLACK FRIDAY & welcome to our "Special Black Friday Sale & mini release for your December Days"! Today we have a couple 
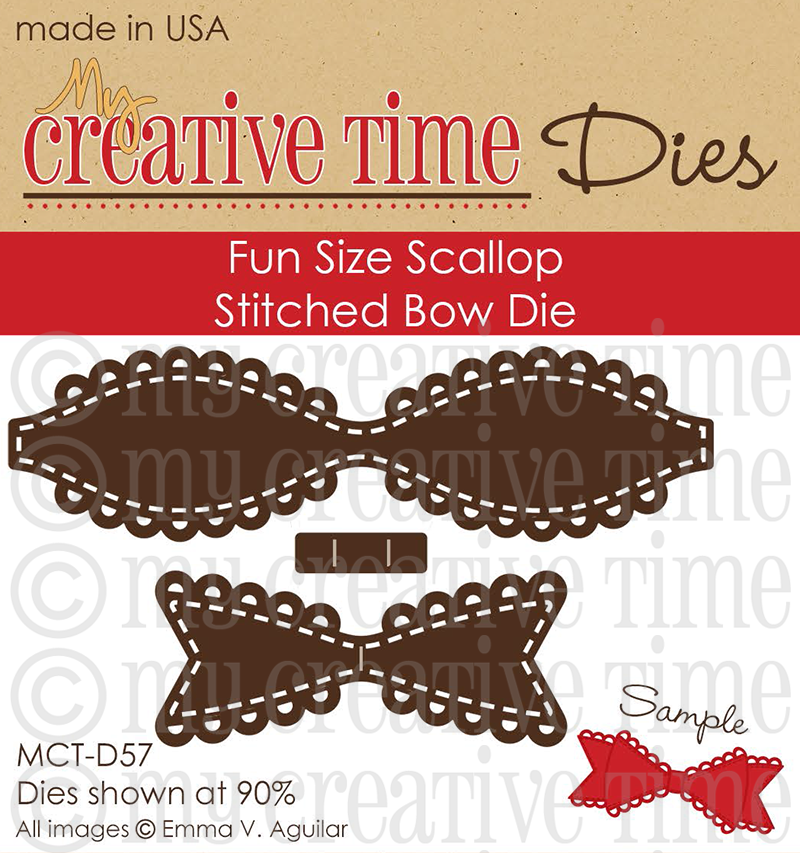
of new stamp sets for you! They are "A Day in December" Stamp; "Get Schooled" Stamp; we ALSO have 3 new dies as you can see here:


These stamps & dies ARE AVAILABLE for PRE-ORDER & will starting shipping out on Tuesday, Dec 3rd!  NOT ONLY are these stamps & dies perfect for your "December Daily's", but they are ALSO perfect for ALL of your Christmas cards, layouts, smash-booking & even your 3-D items etc.....

Okay, here is the BEST PART! EVERYONE who places and order this weekend will receive this FREE STAMP set called: "SHINE BRIGHT"! 


 Well, here is the BESTEST part... If you use the code BLACKFRI2013, you will receive 25% off your entire order AND get this free stamp! The sale starts NOW, Friday, Nov 29, 2013 & will END on Sunday, Dec 1, 2013 at midnight PST!  You can pre-order your new goodies HERE!

WOW!!! Have you guys had fun the last couple weeks?! What amazing new stuff, huh! Well....here's some more for ya! Emma never ceases to amaze...and this release is amazing...like every other before it.

You should have arrived here from Cathryn.

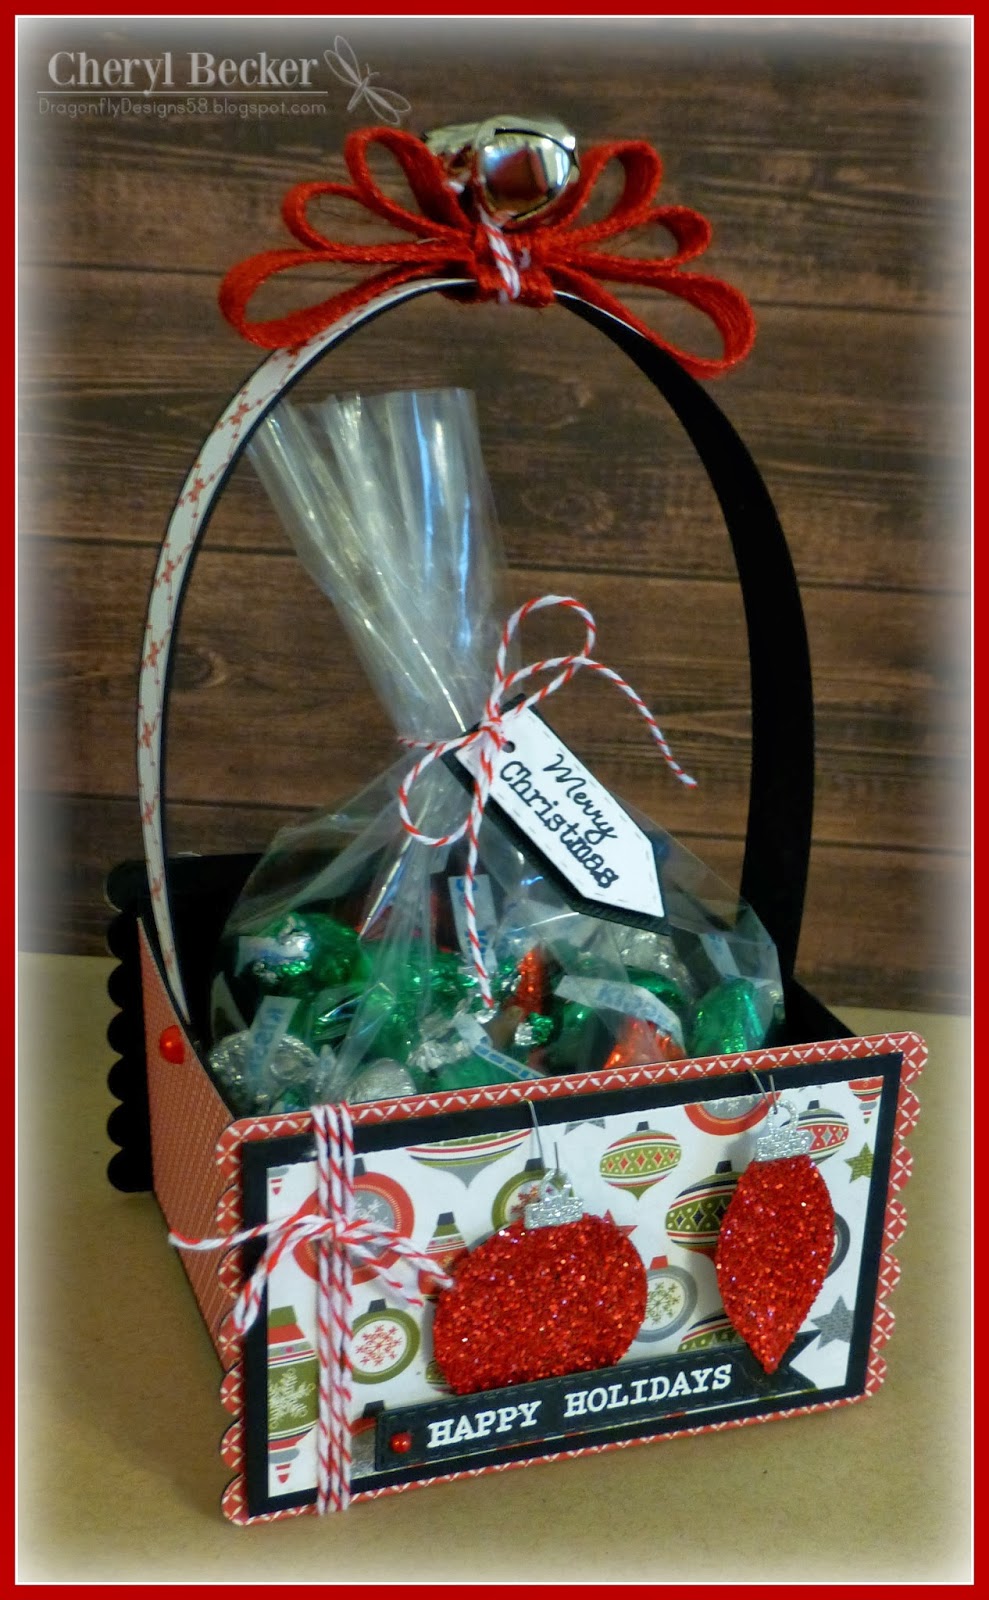
Here's what I made for you today using the new A Day In December stamp set. I really wanted to try a December Daily...but it just ain't happening for me...lol! So, I did a 12 days of Christmas chest of drawers! The kiddos can open one drawer each day for the 12 days prior to Christmas and get their little surprise. I'm really happy with how this turned out.


This is a Lori Whitlock file from the Silhouette store, and I added legs to it. I wanted it to look a bit like a dresser.  I used Carta Bella papers. This is VERY easy to assemble. I love her files for that reason...they go together so neat and clean...and easy!


I went through the new stamp set and picked out lots of little sentiments I thought would be appropriate for this project. Most of them I stamped and hand trimmed, some I used dies for.  For all of them, I attached with dimensional adhesive. If you close, you can see the Wink of Stella glitter brush I used around the edges. I wanted to carry that feel of glitter throughout the project. 


How cute is this?! These drawers are big enough that you can put things other than just candy. Hot Wheels, nail polish, lotion, jewelery....really about anything! 


For day 1, I used one of the talk bubble dies, but it was too long. So, I followed the basic shape, and just hand cut around it to make it a bit shorter. I love that little jingle bell die! And I love Carta Bella's brads that go with this collection. 


And the amazing bow die!!! I love these things. I used two layers of the largest of the bow dies, and for the tails on the bottom, I cut it in half because I wanted them to be out a bit further since I made the bow look bigger. I used my hot glue gun on this, I did not want it coming apart! And I added another of the brads to the center.

So, there you have it...my Christmas Countdown Chest of Drawers...lol! If you have a Cameo, I'd highly recommend this box. You could also use it on a desk or in a craft room for all those little bits of things. Or even for jewelery! 

Here's what I used.

A Day In December Stamp Set ~ New Release

I hope you like my project...and I hope you will think about making one for yourself. This is one of the many reasons I love Emma's products so  much....you can mix and match, use a little or use a lot! She makes it so easy for us to be creative. 

Here is your next stop on the hop. 


Friday, November 22, 2013

Blog Hop!!!

BLOG HOP GIVEAWAY!

For our blog hop giveaway, we will have 2 winners! 
Winner #1 ~  $50 gift card to "My Creative Time's Store'! 

Winner #2 ~ $25 gift card to "My Creative Time's Store"! 
All you have to do is leave your comments on our blogs! You are NOT required to comment on ALL blogs, but the more you comment on, the better chances you have! 
GOOD LUCK! :)


 Emma is offering this "Angel Policy Stamp" for FREE to those of you placing an order starting now & the cut off to receive this stamp is on Sunday, Nov 24, 2013 @ midnight PST! Everyone who places your order between now through Sunday, you will automatically get this stamp in your packages! No need to add it to your cart or leave me a note, you will get it w/your order! To learn more about this stamp, you can read about it HERE! If you miss out on this freebie this weekend, it WILL be available for purchase starting on Mon, Nov 25th! If you are interested in the "digital version" of this stamp, you can download it for FREE HERE!

You should have arrived here from Cathryn's blog.  

Well...the hop for the new release is here! Don't you love everything?! I can't even pick what I like best...love it all!!!

So, here's what I made for you today. I LOVE how this came out. Takes a bit of time, but super easy.


There ya go! Don't you just love it! I do...for sure!
So...to start I cut a 7 inch ring that is 1 inch wide with my Cameo. I layered probably three or four together so it is rather sturdy.
Then, pick your papers and start cutting LOTS of the Fun Size Bow from the new release. I didn't use the tiny piece that wraps around the center because it wasn't going to show anyway. 
I used my hot glue gun to assemble the bows...I did not want these coming apart! 
For each "piece", I used two bow dies, crisscrossed in the middle, hot glued together. 
 BE CAREFUL...THESE ARE LITTLE AND THAT GLUE IS HOT!!! 
Then I hot glued a colored gem in the center. 
Next, I cut lots of just the tail part of the die in red. I then cut those in half. I tucked them in various places around the wreath where I felt it needed it. If you wanted, you could actually do it all green, tuck in and hot glue some of the super cute mini ornaments that out there. Honestly, the sky is the limit with how you could do these. I can envision many color pallets! 
 I kept mine simple, but maybe something glittery would be nice. I stopped here...I liked it this way.
I had some burlap ribbon in my stash and made a loop and bow. I hot glued the loop to the back side and hot glued the bow to the front.
These would make a nice gift that really isn't much money...just your time.

Here's what I used.
Fun Size Scallop Stitched Bow Die ~ New Release

I think that's the shortest ingredient list I've ever had!!! One good thing, you can make this even if you don't have a lot of Emma's products. How cute would this be...BIG....using the other bow die?!?!?!
So...from here, you go on to visit Cindy
Have fun hopping! I know you'll see lots of great things!


Thursday, November 21, 2013

All Roads Lead To Home...

Sneak Peek giveaway!
We will be giving away the sets we are showcasing each day to ONE lucky winner! For example, the set we are showcasing on Wednesday, Emma will announce the winner of that on Thursday & the sets we are showcasing on Thursday, Emma will announce that winner on Friday in her video!
ALL you have to do is leave a comment on each of our blogs! You are NOT required to comment on EVERY SINGLE blog, but the more you comment on, the better chance you have for winning! 
For EXTRA entries, you can spread the word about this release on Facebook, tweet about it OR even instagram it! #mycreativetime!
GOOD LUCK EVERYONE & let's start spreading the word! ;)

I think every sneak peak is amazing...but this one totally knocks it out of the ballpark for me!!!
I'm telling you what, Miss Emma just keeps putting out better and better things!
I wanted to do somewhat of a wall hanging piece. And when I looked over the new release, an idea came to me. I wanted to make something that looked like a window looking from the outside in. So, here is window scene I made for you all.


I used the 4x6 die to cut the opening in the center of the glitter paper, which is 5x7. And I also used it to cut the cream colored layer on the bottom. I attached the cream layer to a 5x7 piece of green cardstock. Then I added two layers of foam tape under the glitter frame. I attached the frame to the cream colored piece. Then I set about to add all the other elements. When finished, I added foam tape to the underside and attached to the red patterned paper, which was attached to the green scalloped layer with atg adhesive.


To make the tree, I just hand cut it from one of the sheets of 6x6 paper pad and mounted it on some dimensional adhesive. I used some of the gift dies to put under the tree.


I used the dies to cut the woman and all her accessories. LOVE THESE!!! It's like playing paper dolls.
I carefully glued each teeny tiny piece into place. She is on some foam dimensionals too. If you look close enough, you can see the glitter on the dog collar and leash. I used the tiny bow dies on some of the gifts too.


When I got this idea, I new instantly which stamp I would use. Perfect, right?! I stamped it on dark brown cause I wanted it to look like a wood plaque hanging on the wall...even added the string it's hanging from. I then added a couple of those tiny bows. It is also on dimensionals. I added the banner die at the top with all different patterns from this collection from Carta Bella. You guessed it, on dimensionals. 

Finally, to mount the entire piece I cut a scalloped mat from SVGCuts. I cut the red patterned paper to
 5.5 x 7.5 so it showed nicely as a layer. Then I added two layers of foam tape to the backside and attached it to the green scalloped mat. 


To hang the piece, I strung ribbon through the two end scallops. I used twine to tie a little bow to hold them in place. Makes a cuter way....to me anyway to hang it. Check out the glitter paper!!! It's by American Crafts. Perfectly smooth...can't even feel the glitter....but wow, does it ever sparkle!!!

So there you have it...a cute little wall plaque to tuck into that tiny space that needs just a little something. On to my list of ingredients.

Classy Girl & Fur Baby Die ~ New Release
Classy Girl Die Accessories ~ New Release
SVGCuts ~ Nested Lacey Shapes SVG Collection

I hope you  got a bit of inspiration today. And I know that all the other DT members have some awesome to show too. Until next time, happy crafting!!!


Saturday, November 16, 2013

Winter church...

Been working on this church for a while now. It's from SVGCuts. Not going to give step by step details as it's too much. Hope you like the pics though. Get yours here 

.