Wednesday, July 25, 2018

Hey You...

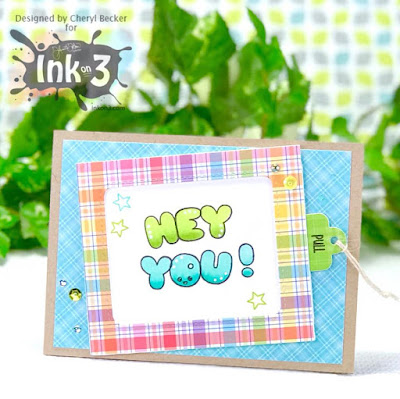
Hey crafters, Cheryl here today, with a super cute slider/window card to share with you.
Here's the stamp sets I used.


This is probably one of my all time favorite InkOn3 stamp sets! I mean, come on, what's not to love???
Anyway, I stamped out a few of the images and colored with Copic markers. And I didn't even do any shading, simple one marker coloring. Maybe I better show you what I used to make the card first.

 
I used this die set from Lawn Fawn. There are videos on YouTube to show how to assemble, it's easy!
On the pull tab/slider piece I stamped "Hey You" using the Phat Alphanumeric stamp set using Blackout ink. I colored them in with Copic markers and stamped a few stars.

 I cut one piece of cardstock just a tad smaller and stamped my inside. The dragon, the flame, and the candle. I also stamped some stars.

 I again colored these with simple one marker coloring. On the flame and candle I used two. Following the instructions in the Lawn Fawn assembly video I closed up my slider. I'll link the video at the end.
Then I went through my patterned papers and pulled out some to match my color pallet. I picked a blue pattern and adhered it to an A2 card base of Neenah Desert Storm cardstock. 
I then added the slider to the front of that on an angle. 
I picked out some gems and sequins and added to the front. DON'T put any in the way of the pull tab slider or it won't open. Ask me how I know, lol. I pulled out my Nuvo glimmer brush and picked a few areas to add shimmer to. It makes things look so pretty!

And that's it! It's so fun to make this type of card and fun for the recipient! If you're a paper engineer, you could probably make this slider from scratch. I'm not, and knew I'd use this often so I picked up from Amazon. Glad I did!

 Lawn Fawn Magic Color Slider (video on their website) 
Ok, take some time for you and sit down to "play" with supplies you have.
Happy Paper Crafting!


Wednesday, July 18, 2018

You Are Fabulous

Hi my crafty friends! It's Cheryl, here, with another project using the newest release from InkOn3.
And it's such a beautiful image and very fun to color!
Here's my project.


I used a die from my stash that creates a rosette. I love rosettes! Anyway, I die cut it from kraft cardstock, Neenah Dessert Storm. You need to cut two. I folded on the score lines and adhered the ends together. It's best to use hot glue for this as it needs to be a really strong bond. Here is a video of how to assemble. 
I stamped out the dogwood image using Juicy embossing ink and heat embossed with white embossing powder. I then die cut the image using the coordinating die and colored with my Mermaid Markers from Jane Davenport. I then stamped out the sentiment onto a banner strip using Juicy and embossed in white.


I mounted the image onto the rosette with foam tape. I then positioned my sentiment near the bottom but not to hide too much of the image. I also used foam tape for this. 
I scattered about some sequins in metallic green and pink. I used liquid glue and held in place a few seconds, as I glued them to the mountain folds of the rosette and I didn't want them tipping. 
I threaded a bit of twine through the holes at the top. I then took the entire element and glued it to a circle die cut in pink that's a bit bigger than the rosette. It really draws in the pink of the dogwood blooms. As a final bit of bling, I pulled out some chunky glitter I've had for ages!!! I dabbed on tiny dots of my liquid glue to the centers and dropped on tiny bits of the glitter. It really adds such great texture and a bit more sparkle. Not being able to stop  myself, lol, I brushed a bit of Nuvo glitter brush over just the petals of the flowers. There, I'm finished with this, for real...lol.

Here's where you can get what I used.

Dogwood Stamp
Dogwood Die Set


Saturday, July 14, 2018

InkOn3 Blog Hop...


Hello crafty friends! 
Time for a new release from InkOn3!
And it is another gorgeous floral! Wait till you see it and all the inspiration from the Design Team!


Here's what I did with it.


How pretty is this dogwood stamp??? I love this. So simple and yet so beautiful!
I stamped and embossed the image using Juicy ink and white embossing powder. I proceeded to color them using my Zig Clean Color Real Brush markers. I used the softest gray and pulled it out with a water brush. I wanted it really pale as I wanted white dogwood blossoms. For the leaves I used two shades of gray. And then I used the coordination die and cut it out.


I then prepared my card base buy using a stitched rectangle die. Then cut an oval from the center. I backed it with acetate and then made a dam of foam tape. I filled it as full as possible, I didn't want much movement. Then put a piece of white cardstock to hold all the bits in. 

For the card base, I cut a piece of silver glitter paper and trimmed 1/8 off the sides to get a thin white border. After adding that to the card base, I added the shaker part to it using liquid glue.

I added the floral piece over top the window using thin foam tape. I die cut the sentiment from the same silver and also from white fun foam. I stamped the sub sentiment on black using Juicy ink and silver embossing powder. And added it with foam tape as well.

Scattered on a few sequins and crystal gems. I also brushed the floral with Nuvo glitter brush. So hard to capture the sparkle, but it's amazing!

Here's the blog hop line up.


Comment on each blog post and be entered to win one $25 gift card! Giveaway will close on July 18th at noon CST and winners will be posted on the Ink on 3 blog!

 So, here's where you can get the supplies used in this project.