Wednesday, June 26, 2013

July 4th Uncle Sam Hat/Box...

I love Summer, and I really love July 4th! Despite what goes on here, we are still the best and most blessed nation on earth! So, to celebrate, I made a super cute Uncle Sam hat/box. I hope you like!

 I found some digital papers online and printed them off at home. I like the shades of the reds and blues in this collection. I believe they are from My Grafico. I'll have a link at the end of this post. I am totally in love with making rosettes and try to use them often. I chose 4-5 of the patterns and then cut them in 2 1/2 inch wide, 6 inch long strips, scored at half inch increments, and then pleated and glued end to end. Then closed it up to form the circle, pushed down gently to get the rosette. I used my hot glue gun to attach a circle to the top and the bottom to keep the rosette shape. Then cut another circle, slightly larger than the box, but smaller than the rosette, to layer on the top.


To make the box, I used a Lori Whitlock file from the Silhouette store. You can find a video tutorial on YouTube. I then picked my dies and stamps from My Creative Time and set about making the elements for the front of the box. I used some Martha Stewart glitter to add some cool sparkle. Happy 4th is embossed with white embossing powder.


I wrapped some red gross grain ribbon around the lid and tied a bow. I then created some wire springs and used hot glue to put the glittered stars on. I tucked the wire in behind the ribbon. It's snug enough that I didn't even have to glue them in place, but a dab of hot glue would make sure they stay put.

So, here are the things I used to make this piece.


There you have it....my list of ingredients. Pull out your stash and whip up some things to celebrate the 4th of July! The nice thing is, you can save this for Labor Day as well. And really, if you did this for Memorial Day, you could use it three times! Happy Crafting everyone!


Tuesday, June 18, 2013

Stitched Journal Die...

Today is Inspire Me Tuesday at My Creative Time. This is sure to be one of my faves! I, as well as you, get inspiration from others. It will be interesting to see what sort of things bring inspiration to other crafters. I often hit a wall...as do many of us...and these type of postings I am sure will be of so much help when that happens. So, what inspired me this week? Well...it's this....


Yep...this die from Miss Emma! I am trying to make it easier to do my Project Life type of scrapbooking. I don't know about you, but I always have scraps that aren't really big enough for much, but too big to just pitch. Well, I have been saving those and then will sit down and run a whole bunch of journaling or filler pieces just the size to fit the 3x4 pocket...and this die is made for that very purpose! So, having a bunch already cut, I thought a little box would be the thing to keep them safe and free from fading. And all in one place...lol...you'd be surprised what I have found underneath piles of junk! So, here's the box I made.


I got this file in the Silhouette store and sized it big enough for the journaling pieces. I actually went a tad too big...but hey, better than too little! I thought the stamps were perfect as these will be used in layouts mostly...events/memories that are noteworthy and that were captured in photos. So, I cut two dies and stamped the words...tucking them under the flower. I tied a piece of ribbon from Paper Trey Ink. 


For the center of the flower, I have a jar of these resin type flowers that I got from Pick Your Plum one time, and hot glued it in place. Then hot glued that to the lid of the box. 


Here's the pieces I already have cut. I didn't stamp on them as of yet, because I can do that when I know how I want to use them. Sometimes it's just a easy when you have your Big Shot out to just run a bunch of stuff for your stash. Then you have them ready at hand when you need some. I have tossing out patterned paper, when it's a good size to do something with.


I think this is a good idea and I am sure it will help you out as well. You could also add any of the other larger die cuts that are in Miss Emma's store. For me personally, I think I will just use it for just these, then I will always know what's in it...not a hodge podge of all sorts of cuts.

So, here's what I used from My Creative Time.


All righty then, get out your scraps and make them into something usable. Create your own little box to organize them...plus it's cute to have sitting out! Hope you got a bit of inspiration today from all the design team members. Have fun crafting!


Thursday, June 13, 2013

Manly Birthday Card...

June is a busy month in our family with birthdays and anniversaries. And a lot of them are guys! So...figured I better get some manly ones put together. Here's the first of more to come.


I LOVE Simple Stories latest 6x6 paper pads...this one is from Urban Traveler. Lots of cool patterns for guy stuff.  I totally distressed the edges for  that rough and tough look fit for a guy. And of course awesome dies and stamps from My Creative Time.


One of the papers had this awesome flag detail...so all I did was cut around all the flags and then I used my Tim Holtz Tiny Attacher to staple it on the first layer of paper. Another cool guy look.


And the amazing stamps and dies are from My Creative Time. How cool is this Potty Peep guy?! I'm totally loving this new frame die...it also comes with an arrow die to go along. I cut several and then did several more with a somewhat plain paper to put back into the center...a perfect backdrop for these awesome stamps! I tied a bit of hemp...nothing over the top since it has to stay manly!


And then I did a strip on the inside to match the card front. I think it's fun to open your card and get another little peek. I'm hoping I'm on a roll with these masculine type cards...love how it looks....and I have several more to do.

So, here's the list of my supplies.


And so, there you have it! Hope you got a bit of inspiration for some guy cards....I always seem to have issues doing those...lol! Happy Crafting.!


Seeing circles...

Hey everyone?! How's the start of your Summer going? I don't have kiddos in school any more so didn't have that to look forward to. I am looking forward though, to fun times with my grand babies and all their Summer/warm weather firsts. Going to be fun!

I have a card to show you today...the theme was circles. It's also Thrifty Thursday. We are to use up some scraps. Well, this card base really isn't scrap but it has been laying on my desk for a while now. So, I decided it's time to do something with it. 


I got this in the Silhouette store. It is card  #3470  by Valerie Foster. If this didn't fit the circle theme, nothing would...lol!  So, I picked my papers...Simple Stories Vintage Bliss...and went to town. I cut the liner piece and glued it to the inside of the front flap. Then I chose other prints from that same pad and created the main element on the front. I used some of Emma's dies, and for the circles I used Martha Stewart's circle cutter. I cut one 2 1/2 and one 2 inches. I inked the edges and layered one on the other. 
Next, I used the Scallop & Stitched Circle Dies from Emma. These shapes I then attached with dimensional adhesive to the Vintage Stitched Label Die...also from My Creative Time. This whole piece I then glued right down to the front of the card. I had to fill that circle though...it was too empty! So I got out the butterfly from the Chunky Jar Accessories Dies. I love that butterfly! I cut two, layering one on the other...only in the very center. That way I could flip the wings up a bit. Then I used a Martha Stewart punch to get two tiny little butterflies. Again, used a tiny dot of glue, only in the center to bend up the wings a bit. Finished off that circle nicely.


I thought that all the holes looked a little bit empty and bare, so I got out my fave button dies and cut several in both sizes from several different prints in this pad. I LOVE THIS PACK OF PAPER!!! I know I am going to have to get more of it...can't run out! Anyway, I then laid them out till I got a look I liked. But...I still wanted something smaller. Well, I had a 1/4 inch paper punch and it was perfect. So, I punched a few of those and put in the smaller spots. I liked it better then. 
On to the sentiment. I used the label die from the Vintage Label Die Set. However, I snipped off one end just enough to get a straight edge. I did two colors, inked the edges, offset them a bit, and stapled them together with my Tim Holtz Tiny Attacher. Love that little thing....dainty staples....lol! I added some dimensional adhesive and attached it to the front of the card. The sentiment is from the Vintage Sentiments Stamp Set.

So, here's the list of ingredients...lol


Hope you like my card...it's fun to be given a challenge and then make it happen. So, I challenge you...make a project using this circle theme. I'd love to see what you do! Happy Crafting!!!


Wednesday, June 5, 2013

Let's Hit The Beach...

 Hey guys, another 3D project for you today. I love how Lori Whitlock's files go together...so clean and easy! This little shaker top box is from the Silhouette store. It's fun cause you can fill the top with whatever you like! So...here's mine.


It's just about officially Summer! So...a beach themed box. I recently joined the DT for Fleurette Bloom...she started her own digital paper and svg company. These papers and cute elements are from her newest release. I will have a link at the end. I got the file for this box in the Silhouette store...love Lori's files! I used print and cut on my Cameo for these elements as well as the papers. 


I used one of the dies from the Build A Banner kit for the main sentiment on my project. It is from Have Fun In The Sun. I wrapped twine around the box several times to look like the ropes on the poles at the dock. I glued on the two starfish and popped the octopus on a dimensional adhesive.


Here is a look into the top of the box. I glued down some anchors and popped up the star fish and octopi. I  added a bit of chunky glitter and some clear blue bits to resemble sea glass. The chunky glitter resembles sand. You can shake it around a bit but the other elements stay put....I didn't want them flipping over.


Here's a look at the sentiments I put around the lid. I chose three I like the best for this project and added them with foam adhesive. I once again used the technique of cutting the die once, then moving the paper down a tiny bit and running it through again...to get a little shorter tag. Then I stamped the words. They were a bit longer than I needed or wanted them to be...and that fixed the problem. Miss Emma has shown this in her videos before if you follow her.

So, that's it for me today. I hope you like my little box. I'm thinking this could be a fun way to invite someone to the beach. Fill with treats or miniature sunscreen, lip balm, hard candies or anything to take along with you. 

Here's the list of what I used to make this project.


Have fun crafting...making some super cute Summer projects. I look forward to seeing what you do. And be sure to check out Fleurette Bloom...she's got some super cute digital papers and coordinating SVG files!


Monday, June 3, 2013

Scrapping The Little Things...


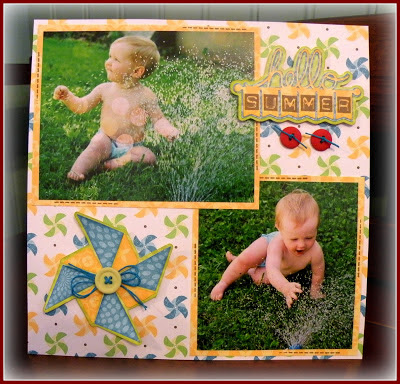
Welcome to Scrapping The Little Things. I have two 8x8 scrapbook pages for you today. This is the first time my precious Karson played in the sprinkler! He absolute loved it! I hope these pages convey that to you.


He had so much fun and water in his face didn't even bother him! Gotta love that boy!


I used Emma's ticket die to layer under these print/cut images from Carta Bella. I used the trick I am sure you have seen in her videos...to cut the ticket twice to make it a bit shorter. It was a perfect fit!


 I used the new stitched journaling die and created a mat under it. I will do my journaling another day. I also used the Label Font Stamp Set for the "Keep Cool"...love how it looks!


I'm sure you would agree...childhood times in the sprinkler...were a sure fire way to beat the heat. I am sure this is going to be enjoyed a lot this summer....they loved it!


Here is page two. I found the Hello Summer in the Silhouette store. I broke it apart so I could use Emma's stamp for the word summer....instead of what would have been cut out. I created to mats to layer it on as well. The pinwheel is also from the Silhouette store. I created a mat layer for that as well. Tied a bit of hemp and added some buttons.


Here's better close up of the pinwheel. I used hot blue for the hemp and the button. If you notice, there is a bit of stitching on all the bottom layer of the photos. It is from a stamp set and I will have it linked at the end of this post.


Here's a closer look at that element from the Sil store. Added hemp to a couple buttons and hot glued in place.


Here are the pages side by side. Not sure if they will go into my scrapbook or to my daughter for her shadow box frames. For throwing this together pretty quickly, I'm happy with how it turned out. Little by little, I am getting some great pages for the babies to look at when they are older. 

I hope you like these...here's a list of what I used.


Intimidated by 12x12 layouts?! I am....so these little 8x8 are perfect for me...on any level! If you have the same issue...try this size. It's way easier...at least for me! So, get out your supplies and whip out a few pages of your own! Happy Crafting!