Wednesday, January 30, 2013

You've Got Mail...


Need a cute way to give some love this Valentine's Day? This is just the perfect way to do that! I have seen so many cute little mailboxes over the years and I have never picked any up. Well, Target has these every year and I made sure to get some this time. They are adorable and come in white, pink, and aqua blue. Here's what I did.


Isn't it cute?! I love how it came out for being my first one ever! I first measured the width for my paper. It was 3 15/16 wide and 12 inches long. I tried to eyeball how big of a slit to cut to go around the flag. First try wasn't right, and the second was perfect. I use Scor Tape to attach the paper. I am in love with this collection of paper from Carta Bella....Devoted. I have it in digital and also have a 6x6 pad. I cut the little tickets out of the smaller pad and printed the other papers at full size. 


Love these little tickets! I put the grouping of two together with my Tim Holtz Tiny Attacher. I then put two layers of foam adhesive on the very left and very bottom so that the flag could still move up and down. I tied a double bow with some twine and glued a thin strip of card stock to the stem. Love how this looks.


I LOVE these heart dies from the latest release at My Creative Time. It is so nice how they nest inside each other and you can pick contrasting papers. I like how the red just frames the inner heart so perfectly. Then I used the largest of the layering hearts as well.  You can see that I cut a layer of one of the other papers and used my scallop scalloped punch and attached with Scor Tape. Gives it a nice little "base".


   I used the same heart die for this one but used the outer and middle layers only. I like how the center is open and you can see the background paper behind the sentiment. I stamped with VersaMark and used white embossing powder. I attached it with foam dimensional adhesive. Added some dots with my white gel pen....of course! I took the caps off and traced it on the designer paper to get the perfect fit to go on that cover. I have two more to do and can't wait....these are so fun! Now just to find something super cute to put inside for my precious grand babies for Valentines Day.

Here's what I used for this project.


I hope you can find these your Target stores, because they are just the cutest! Whoever receives one, will love it!


Monday, January 21, 2013

Birthday Boy...

Well, the holidays are behind us and the new release is out as well. So, it's back to our regularly scheduled programming...lol. Seriously though, the DT is getting back to it's regular schedule and I have a layout to share with you today. It's supposed to be Smashbook or Project Life style, but I'm not doing Project Life and she said we could do a regular layout too. So, I'm liking the 8x8 size pages and that is what I'm trying to focus on. I want to get some nice books put together of my beautiful grand babies. So, since Karson just turned one, I took this opportunity to do a layout of him.
Miss Shar had given us a photo to use for inspiration. I took a few ideas from it to get started. It had a wall piece that looked sort of like a ladder on it's side...lol. Like squares in a row...hard to describe, but I used that to get the layout for my title. I then used some of the colors that were in the inspiration photo. I chose the yellow, red, and blues to work with. And these papers were great for that theme.


Here is the layout I did for him. Ahhhh....he makes my heart melt! Anyway, it's obvious he loved his cake, lol. I layered this photo on a blue mat and then on dark brown.  The papers I used for this are from Echo Park's Little Boy collection. I also used some of the elements in that kit....the stars and the "Oh Boy". I used my Silhouette software to trace the stars, made a mat for them, and then printed and cut them. For the Oh Boy, I did not cut it on my Cameo, I used a die from My Creative Time to cut that out.


I printed it, and then I used a piece of scrap paper and cut it using the die. This created a frame for me to see exactly where to line up the the sentiment so it cut right where I needed it to. I laid the frame on just right, put the die back in place, and used a bit of tape to keep things from moving . I ran it back through my Big Shot and it cut the sentiment exactly how I needed it to. A good trick to remember when you need to cut in a specific spot and obviously can't see through a metal die! Worked perfect! I cut another one in dark brown to layer just at the ends so it popped a bit more, cutting off any brown that showed where I didn't want it to. I wanted just the ends.

 Now, on to the title of my page. I cute some small squares of white cardstock. I needed to take some of the harsh white away so I used some Tea Dyed Distress Ink from Tim Holtz to make it look a bit more aged. I used the alpha dies from MCT to spell out I'm One. I popped the squares up on foam dimensionals onto blue cardstock and then onto dark brown. I tied a bit of twine to separate the words.


Isn't he the cutest?! Sorry, I'm a NeNe...I get to brag a bit...lol. Really though, he surprised us cause we didn't think he would do much with his cake. Well....were we ever wrong! He got right in there and there was no stopping him. He loves his food! To finish off my page, I added a bit more twine to a star, and got my white gel pen out and made some white dots throughout the page. It's sort of my thing, that white gel pen! I always seem to have to do that...oh well, whatcha going to do?! I am not a big scrapbooker but I'm liking these smaller size layouts and have to say, I'm enjoying it! Who would have thought...lol. 

So, on to what I used.


If you aren't into scrapbooking like I really wasn't, start by maybe trying a smaller layout style. It helped me! Let's just say, going from a card to a full 12x12 page scared me to death! It was just too much space. I would get into panic mode! But, I do really like these smaller pages and I can at least get some memories saved! So, stretch yourself some...do something that is challenging for you. You may realize, as I did, there is more than one way to do something!


Sunday, January 13, 2013

Nesting Hearts Door Piece....

Time to get something on the front door for Valentines Day. Browsing around on Pinterest today, I saw these cute hearts made using just strips of one inch wide papers. I thought it was cute and simple, and wouldn't take me a month of Sunday's to make. So here it is...and of course I had to add some awesome stuff from My Creative Time!


I used five strips of paper on each side of the heart. So you cut two of each. Mine are one inch wide and then 12, 11, 10, 9, and 8 inches in lengths....two of each. Putting all of the ends together punch a hole. Then flip them, put all the other ends together and punch another hole.  If you are using designer papers put like sides together. Starting with the shortest, put like sides together. Add the next longest on each of the outer sides. Add the next longest...like sides facing in...one on each side. Do this till all your strips are together. 


I used ribbons to tie the bottom ones together. I then used a piece of twine to secure the ribbons by tying a bow. To do the top holes, curve the shortest ones in towards each other. Take the next longest, tucking it between the shortest, lining up your holes. Then do the next longest strip and do the same. Continue on until all your strips are tucked in, forming a heart. Thread twine or ribbon through the holes and tie to secure.


I used one of the newest dies from My Creative Time for the hearts at the top and the one at the bottom. I used my hot glue gun to glue on the hearts and then added a felt heart to the centers using a dimensional adhesive.


This wasn't the easiest to get a good pic, hope you get the idea though. I love how that fancy heart die finished off the top! Love me some My Creative Time!

Hope my instructions are clear, and I think from looking at the pictures you really can figure out how to do it. Pick out some of your designer papers and make one for yourself. 
Here is the die I used for that pretty heart.


So, there you go...a cute nesting of hearts for your door or anywhere else you may want to hang one. This would be perfect for teachers to decorate their classrooms!


Friday, January 11, 2013

Welcome Little One...

Welcome to the newest little one in our family! I have a new great nephew! Had to get right on making a card to send out. Here is the card I came up with.


 Isn't this the cutest elephant! I used a Lettering Delights file and my Cameo to do a print and cut of this little guy. I love my Cameo for this very reason! Print to Cut is spot on! I cute several various sized circles of coordinating colors to layer. And of course, I had to use my white gel pen.


I used an embossing folder on the white layer...love the little dots! I added a shiny black pebble to cover the printed eye and add some dimension. 


And of course....my fave stamp company...My Creative Time! I used the All Star Baby Stamp set and picked out the two I liked the best. I love how this little stamp curves and bends...so pretty! I curled the banner a bit so it has some dimension...hard to see that in the photo, but the flag end curves up a bit and then there is a bit of a dip and curves back up again towards the other end.


And for the inside...this is the one I picked. And how true is this! A baby changes your life forever! 

I hope this little card gives you a bit of inspiration. I love the scalloped shaped card using another Lettering Delight file and welded two together. I cut one more to attach on the top so the welded fold is hidden and the entire scallop shape is visible. 

So...here is what I used...

Cutie Patootie SVG Set ~ For the card base


Monday, January 7, 2013

My 3 loves...

You can't keep a crafter down with the flu! I was feeling a lot better today and felt the urge to play. Here is a card I came up with. Hope you like!


I like how this came out. Can't take credit for some the ideas. One of my fellow DT gals did the chocolate kiss in foil and I loved the idea...so I lifted! I got the idea for the ribbon coming up and down I think on Pinterest....don't remember. I just thought it was cute so I lifted that too...lol!

If you look closely you can see I punched a hole above and below the sentiment. I then threaded the ribbon in and out and tied in a bow on the front. 


 Now tell me, who doesn't love chocolate, coffee, and crafts?! No one I know, anyway...lol. Aren't these dies from My Creative Time just the best? They are so perfect, and I go to them all the time!


The stamp is perfect! I picked it first, then set out to find stamps and dies that would go good with it. The new chocolate die and the coffee cup die are just perfect. I love that foil affect with a bit of the brown peeking out. So...here's what I used.


So, there you have it. Hope I gave you some ideas...even though I lifted a few....get your supplies out now, and give some of them a try...putting your own spin on it!


Saturday, January 5, 2013

Sucker for You....

I had this idea in my head for a bit and I didn't know Emma had the perfect stamp for these Valentine suckers! Super cute way to jazz up those gourmet suckers from the store.


 I used the Scallop & Stitched Circle dies for these cute sucker toppers. I used my Cropodile to punch a hole in the center of both layers. It was still a bit small so I use my scissors and snipped 4 little slits going in 4 directions. This allowed just the right size to slide over the sucker stick and the wrapping that is around the base of the sucker.


And this circle sentiment is perfect! "I'm A Sucker For You". Love it! I added a piece of dimensional adhesive between the layers. It's hard to see in the pics though.


I made several using different Valentine's Day papers I have in my stash. Mostly Echo Park & Carta Bella. Love their new papers!

Here's what I used.


Hope you get a chance to make a few of these for special people in your life.


Copic ~ First try...

I have been wanting to start collecting Copic markers for some time now. So my hubby got me a set for Christmas, and I have been trying to fill in colors for good blending. This isn't so easy, lol! But, I love to color and I know it will take time and practice. I'm willing to put in that time cause I love the look. So, here is my first card I made with an image I colored. It's not the best, but I don't think it's  the worst either.


I have the most trouble with the skin! The hair isn't easy either but you can blend more colors better and the variations don't have to be as close in tone. The skin for me will take lots of practice. 


I love her glittery wings! I added white gel pen accents to her dress and the edge of the card.


Threw some glitter on her wand and tied a bow of embroidery floss.


The stamp is from My Creative Time and when I saw it, I knew that would fit this little girl perfectly! Gotta love MCT Stamps!

Here is the set that stamp came from.


Watch in the future for other projects using my Copic coloring!


Wednesday, January 2, 2013

Extra Large Love....

Love chocolate? How about extra large chocolate?! How about giving an extra large chocolate bar to your love on Valentine's Day?!
I made this cute card/box that holds a BIG candy bar. I believe it is the 4.4 ounce bar. You can decorate this for any occasion that you want to give some candy.


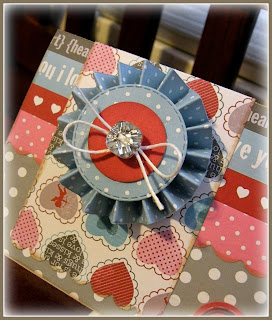
Isn't this a great way to give a bar of chocolate?! I cut the box on my Eclips machine and put it together. Then I set about to decorate it.  I made a paper rosette....there are tutorials out there if you've never made one. I used the Scallop & Stitched Circle Die for the larger circle on the rosette and a 1 inch circle punch for the smaller. one. I used one of my fave buttons from Liz's Paper Loft and tied it with some jute from her as well. 


Isn't that pretty?! I layered the rosette on one of Emma's tag dies...the one with the scalloped edge. I scored and folded the top over the top edge of the box. 


 I used the Circle Font Stamps for the word LOVE and stamped them on the circle that comes in the Build A Banner Kit. I love how these turn out. Great thinking, Miss Emma! I popped those up on dimensional adhesive.


 And check out what's inside! A BIG 4.4 ounce chocolate bar! I used the Fancy Frame and Die Set for the sentient. I cut another in red and then I cut that in half, top to bottom. I snipped off the bits that would show and used it as a layer for the sentiment. I also popped this up on dimensionals. 


I love the stamps in this new set...Lots of Love Stamp Set! Such pretty fonts and pretty sayings. I love them! Way to go, Emma! 
So, there you have it. A nice little package for a BIG candy bar. Make up a few yourself, to give that special someone on Valentine's Day. I found the 4.4 ounce candy bar at my Walgreen store. I'm sure you won't have trouble finding them. Here is a list of what I used.

Candy Bar Wrapper 
Liz's Paper Loft Boutique 
Paper is from Carta Bella called Devoted


Tuesday, January 1, 2013

Hello Kitty Skater...

I have the privilege of guest designing for Ruthie today. Thanks so much Ruthie, for the opportunity and for being so generous with these super cute Hello Kitty images! This one is super duper cute!

Isn't she super cute! I can't look at these images and not think glitter and sparkles! So, I got out the Martha Stewart glitter and went to town. Everything has glitter except for her face....lol. I used shades of purples, pinks and bright pinks. Also used her plain/regular glitter. 

I cut an oval at the bottom of a 5x7 card base. I printed some vellum with a very light blue to look like ice. I then used one of MCT dies...the clouds...to make the snow banks. I covered them in blue and then sprinkled with Flower Soft in white. Really, I took white styro foam, rubbed vigorously over a container and you end up with this stuff that's like snow! And much cheaper than in the store. You should try it. Anyway, hope it looks like she's skating.

And one of Emma's cute stamps from My Creative Time finishes it off. Who doesn't love her stamps! I know I do...for sure!
Thanks Ruthie, for asking me to guest design on your blog this week. I love these images and love that you share. And love that you allowed me this opportunity. Every head over to Ruthie's blog, Septemberninth. You can find this cut file there for free when you become a follower of her blog.


My Creative Time
It's A Magical Season Stamp Set
Ruthie ~ Hello Kitty Free File

Head on over to Ruthie's blog and be on the lookout for this free file! Thanks Ruthie for allowing me to guest design for you. These images are so fun to play with and it's super nice of you to share!