Monday, September 5, 2016

Another Peak of the new release....

Ok....so, I think this is the cutest pumpkin ever!!! 
I decided to pull out some cute patterned papers I had for fall time and I stamped the pumpkin on one of the orange papers. Then I grabbed a few Copic markers and added some shading. I used white gel pen on the eyes and then a coating of Glossy Accents. 

I pulled out some circle dies and made a layering to use on the center of the card. I used some foam tape for added dimension. 

I also cut a little tag and stamped and white heat embossed the sentiment. I tied a bit of twine and glued it on the stem. The patterned paper for the background was also cut using a square die. It is cut to 4x4 and adhered to a 4 1/4 x 4 1/4 size card base.


I found some enamel dots in a real soft gray that looked good with the patterned paper, so I put one in each corner. I don't often make this size card and don't know why....cause I like it for something different and it will still go in a standard A2 envelope. 

Anyway, so there you have it. A super cute fall card that uses all patterned papers. Quick and easy yet super cute! 
Head on over and check out the new release! Some really fun stamp sets are available for pre-order,


Get your craft and have fun with some new products!


Sunday, September 4, 2016

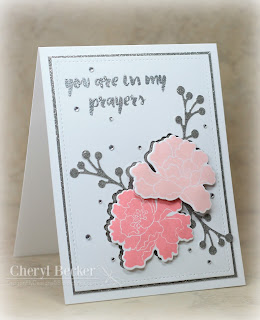
You're in my prayers.....

Altenew is one of my fave companies!!! LOVE them, and am acquiring a fair bit of stuff. I love their inks, so love them, and all the layering stamp sets. This one, though, is a solid stamp.


I kind of figured where I wanted them to lie on my card and used the coordinating die and cut it out. Then I positioned the sentiment and stamped is sticky ink and embossed with silver glitter embossing powder.
I cut silver glitter cardstock and layered it behind. I popped up the darker flower on one layer and the lighter on two layers. I offset it just a bit so the silver paper could be seen more. 


I cut three of the berries (other misc dies in my stash) in silver as well and arranged around the flowers. Added some clear crystal bling and mounted it to the front of an A2 sized card base. 

Calling this one finished!

Here's where to shop.

Hope this inspired you a bit. Happy Crafting!

Thursday, September 1, 2016

New Product Release Sneak Peak....

ARE YOU READY!!!!
Yay!!! The time for Sneak Peaks of the new release is here!!! Are you ready for some cute stamp sets by Fleurette Bloom, aka FBStamps?!?!?! 

I have a card to show you today using one of the new sets. Until Fleurette, I had no idea what a Sugar Skull was, lol! Just hadn't crossed my radar, lol. I do now, and soooo cute! Anyway, I used the Sugar Skulls Stamp Set for this card.


First thing I did was create a grid on my background using a T-square ruler and stamped the smaller Sugar Skull on a diagonal line to create a fun pattern. Then I grabbed some fun colors in my Distress Markers and watercolored in the skulls. 
I cut a frame in black using a Pretty Pink Posh die and glued acetate to the back. I then used two layers of foam tape to have room for the sequins to shake. I chose sequin colors like the background and put them into the frame piece. Then I put the background piece on top. And shake, shake, shake! I love shakers!!!
 
I took the larger Sugar Skull and used black embossing powder. Then I chose just a few spots to add some pops of color....same as in the background. I used some Stickles to make the frames around the glasses nice and sparkly. 
Then I embossed the sentiment on a strip of black and cut using the same frame die so it would nestle right into the scallops. Nice and tidy! Lol. I added some foam dimensionals to the back of the Sugar Skull and adhered it right above the strip. Added a few more sequins and then put that piece onto the front of an A2 sized card. 
Keep watching! There will be new Sneak Peaks every day. Lots of cute new stamp sets and you won't wanna miss any of them. 
Here's where you can shop for all the new goodies.

Hope you have fun watching the new stuff being shown, and hope you find a bit of inspiration as well!

Happy Crafting!