Sunday, January 21, 2018

Treat Basket...

This basket that Fleurette designed a few years back has always been one of my favorites! I've made it several times. And I'm so glad she carried it over when she re-branded to InkOn3. So, I decided to make it for Valentines Day and put some cakes in it for my grand kids when they come over.

So, here we go.


I chose this pattern of digital paper from her new collection and printed it out on my home computer. You can also take the files on a flash drive to a local copy store and have them print it for you. 
I opened the svg files in my Ecal software and cut it out using my Eclips2 cutting machine. Assembly of this basket it very easy! I opted to use ribbon for my handles instead of the one included in the kit. 


I used one of the heart cuts from the card file and cut a bunch for the edge of the basket. I spaced them out for three on each panel. I then used a heart punch from my stash and cut out tiny hearts from some silver glitter paper and layered them on top. Pictured in the background is the card I made last week to go along with this. I used one of the new shaker cards available in the SVG section of the store. This would be a very nice gift to bring to a loved one for any special occasion. Not only Valentines Day. 


So, that's it from me for today. I hope you'll head over to InkOn3 and check out what's there. You'll find a great variety of stamp sets, and svg files, and digital papers to print. Here's where you can find what I used in these projects. 


So that's it for today. Hope you got some inspiration and will head to the store and will follow us on FB and Instagram. You'll see lots of really cute things from our Design Team.


Saturday, January 13, 2018

Valentine Treats...

Hey there! I have some super fun Valentine treats to show you today. Using InkOn3 digital papers and stamps. Let's get to it.


All my treat packaging was created using dies from My Creative Time. 
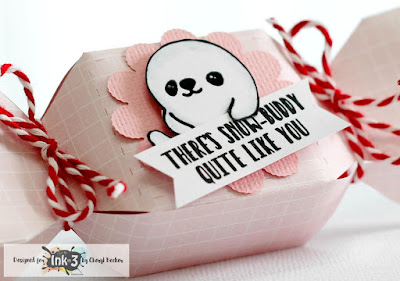
I printed out my digital papers using files from InkOn3. I also used tags and stamps from the Snow Buddies stamp set.


 How cute is this little seal?! Adorable, right? I very lightly colored him in very pale gray, just around the edges for added dimension. I cut around his fin so I could tuck in my sentiment. 


For this slider box of chocolate nuggets, I added a bit of color and sparkle to the digital paper. Colored up the adorable bear, tied some twine, and added some sparkle sticker dots. I wrapped a strip of digital paper around each nugget. This slider holds four.


Ok, so how many of us own that crimping tool? I used a rectangular piece of paper and strong double sided tape to close one end. Then again but rotated a bit to get that sour cream packet look. I then crimped each end a tiny bit to give it that "for real" look. I stamped out the sentiment on one of the mini tags from this release. I love those little things! I also used a piece the penguin paper printed on the laser printer so I could foil it using bright pink foil. So fun!


Finally, I used a sucker holder die with more digital paper. I ink blended onto another mini tag and attached it using more twine. This die comes in this size for bigger suckers and a mini one for small suckers. I love these! Perfect for children to bring to school.

So there you have it. Some super fun ways to hand out some goodies. 
Here's where you can get these items.


I hope you got some ideas for making treats with your children. Let them help you, they'll have so much fun! Don't we all want our kids to tap into their creativity? And make some great memories along the way.
Happy Crafting!


Monday, January 8, 2018

Snow Buddy like you...

So, I have been playing around with the new release stamp set from InkOn3.com. It's sooo cute!
Here's one card I made.


I printed off some of the digital papers on a laser printer. I then grabbed some pink foil and foiled it using my Minc. I used some distress ink and blended on some pink ink. So hard to capture the awesome shine of the foil. 
I then used a tag die by KatScrappiness and cut the paper. I trimmed of the sides to make it narrower to fit the card front. I backed it with acetate and used foam tape to create a well on the backside for the shaker bits. On top of that, another piece of acetate to close it up. This makes it easy for placing on the card without shaker bits going everywhere! I tied a bit of twine around and set it aside.


Using another of the printed papers, I cut a layer for the card front and inked the edges and used tape runner to adhere. 
I then glued the tag piece to the card front. I had stamped out and cut using my Scan N Cut, one of the penguins. I colored it with my Spectrum Noir alcohol markers. Using foam tape I added this to the card front. Stamped the sentiment and cut using a banner die in my stash. Added it with foam tape as well. Using some of the same sequins as the shaker, I glued a few around on the card front. Brushed on some Wink of Stella and called this one finished.

Here's where you can shop for the products I used.


Hope you got some inspiration and will get out your supplies and get your craft on. Head to InkOn3 and check out all the great stuff!