Wednesday, October 30, 2013

Candy Corn Treat Box...

I'm not such a big celebrator of Halloween. However, I love Autumn, pumpkins, fall leaves, scarecrows...all the cuteness of Halloween....just don't really get into all the creepy stuff. But I love to make fall things with fall colors and elements. Here's a recent box I made using some files and digital papers from Fleurette Bloom.


I love the color pallet of this paper and love that little candy corn guy! I designed this in my Silhouette software and created a window in this box from Lori Whitlock. I flood filled it with her digi papers...LOVE this candy corn paper. I also added the white stitching in the software...a print line, not a cut line. So easy that way.


See that cute paper?! I used a bit of ink on the edges of the box. I cut two of the cute little guy and two of the sentiment. I added foam dimensionals for dimension. Also...so loving the enamel dots these days! So cute! Added a few of those and tied a bow with some crinkle ribbon. 

I hope you like! Here's the place to get all these goodies.


So...get out your supplies and whip up a few of these cute boxes...you can put ANYTHING in here...not just candy and treats either. 
Happy Crafting!


VIA Tag Gift Box...


Hey Guys! Welcome to another 3D Wednesday. I have loved seeing all the cute tags around lately and so I decided to start making lots of them. If I have a bunch ready, they are so easy to add to a card front, a gift bag, any box, or just to tie on to treats. So....here's the one I made this past weekend.


I love how this came out for not much experience using Distress Inks and that rustic look. But...I stamped out the background and then set about using some Tim Holtz Distress Inks and a sponge applicator to distress it a bit. I believe I used Vintage Photo. First I did just the edges, then I decided to go over the entire surface. I wanted to "warm" up the tag a bit more. 


I also stamped the strip using the cappuccino background stamp. Then I made a shadow layer and to get the scallop edge, I used the bottom edge of the tag die. I did each edge, eyeballing it to get the width I wanted to layer the top piece over it. I used the same paper to make the band on the coffee cup. I also distressed the cup using the same distress ink.

  
I used a 1 inch punch and stamped the coffee beans, then attached a 1 inch clear gel sticker. I tied on some crinkled ribbon and used a dimensional square to attach the button. You can't see it, but I used the reinforcer die on the hole of the tag. I stamped the sentiment, distressed, and added a few enamel dots. I curved the stamped sentiment down in the center and up on the edges...adding a small dimensional in the center to keep it up.


I cut another tag to use on the backside. I created a very simple, narrow little box that is 1/2 inch thick. I figured out the finished size I wanted and added enough to have a 1/2 inch on each side and the bottom. Scored and folded up those edges and used Scor Tape to keep shut. I then glued the back and front tags on to this narrow little box. It is perfect to add the VIA coffee packs but I imagine it would hold several different candy bars from the store. You'd have to make sure it's not too thick or adjust your little box to be big enough to accommodate.


Here is a pic with the Starbucks VIA that I used. I love this one...I drank it a lot this summer cause it is an iced coffee. Caramel! Yum!!! You could use any that you prefer though...and what a cute little gift you have. You could do a bunch of these in Christmas papers, hang them on your tree, and then when guests come, you can take one off and give to them as they leave. Even put a couple candy canes in here to give...and how cute would they look on your tree!

I hope you like my gift tag/box...here is a list of what I used.


There you have it, that's what I used. Trust me when I say, I'll be making a bunch of these! In fact, I'm going to use the Christmas Tree idea, and have a bunch ready. 
I'd love to see what you come up with...share pics on Facebook and tag me if you'd like.
 Happy Crafting!


Tuesday, October 29, 2013

Pillow Box With A Window....

Still in need of some cute little treat boxes? Fleurette Bloom just released a new set of pillow boxes...and they are adorable!! Used my Silhouette software and filled the image with some of Fleurette's digital papers. Perfect for fall! So, here it is.


I added some sequins from Lawn Fawn. I love those sequin leaves! Anyway, I created a simple circle window and a frame to go around it. I used the software to layer the circle over the scalloped piece and subtracted and got the scalloped frame. Adds a nice little touch.


I used my Stitched Circle Die from My Creative Time, and one of the circle sentiments for Halloween. Tied some of my crinkled ribbon around the box in a bow and called it done. 

There are several styles in this collection and I know you'll love them! Perfect for giving away some treats at holiday time.


Thursday, October 24, 2013

Halloween Hustle Day 4...


Welcome to our 5 days of "Halloween Hustle"! Yep, we will have 5 days worth of last minute ideas to trick your treats!  You will ALSO see 3-D projects, home decor & even cards!  I hope you are ALL ready for some HALLOWEEN HUSTLE "FUN"! There will be giveaways all week! Check Emma's blog to see what it will be!  Also, if you missed out on our sale last week! Well....for this weekend ONLY, starting this Friday 10/25/2013 @ 12:01am PST  thru Sunday 10/27/2013 @ 11:59pm PST you can use the code OCT2013 to get 20% off your entire order in my store HERE!  Remember I told you about making a "Teeny Tag Holiday" stamp set? WELL....wait no longer, it will be available this Friday, 10/25/2013  in my store HERE!
Today is day 4 of our Halloween Hustle. I hope you have gotten some ideas, and enjoyed all the projects from our DT, I never get bored playing with Miss Emma's stamps and dies...and I am sure you don't either.
Here is my treats for today.


You've seen the sour cream packets, right? Well, make your own and fill them with goodies. Cut a rectangle...any size. Make it wider than longer. You will want to use very strong adhesive for this. I use Scor Tape. Add it to one short side and both long sides. Wrap the short edge with the tape over the other and press to stick. Then, align one of the top edges and press good to stick. Now...turn the box half a turn so the next side closes the opposite of the first one. I have one of the paper crimpers for crimping paper...well, I use that to crimp just the very edge. Don't turn it in too far, you don't want to ruin the box. 

So, pick some cute papers and whip up a bunch of these...so fun to make, and peeps get to just rip them open! Here are the ones I made.


For this one, I cut the ghost out of glitter paper by American Crafts. Wrapped some twine and added a sentiment.


For this one, I used the circle of the scallop circle die set. Added a sentiment, some enamel dots, and a bit of twine.


For this one, I stamped right onto the paper, added some sequins, twine, and a cute pumpkin. Aren't 
they cute?!

So, here's what I used for these cute candy pouches.


Tuesday, October 22, 2013

Halloween Hustle Day 2...


Welcome to our 5 days of "Halloween Hustle"! Yep, we will have 5 days worth of last minute ideas to trick your treats!  You will ALSO see 3-D projects, home decor & even cards!  I hope you are ALL ready for some HALLOWEEN HUSTLE "FUN"! There will be giveaways all week! Check Emma's blog to see what it will be!  Also, if you missed out on our sale last week! Well....for this weekend ONLY, starting this Friday 10/25/2013 @ 12:01am PST  thru Sunday 10/27/2013 @ 11:59pm PST you can use the code OCT2013 to get 20% off your entire order in my store HERE!  Remember I told you about making a "Teeny Tag Holiday" stamp set? WELL....wait no longer, it will be available this Friday, 10/25/2013  in my store HERE!

Ready for another idea for Halloween treats? 
I love my Starbucks Via mixes. And I'm willing to let go of one or two...lol...as a treat for that special someone. I made a cute pocket to hold one and jazzed it up for Halloween. And honestly, you could make this pocket for any reason...that's what's awesome about My Creative Time...so much cuteness for any reason!!!


I used the new envelope die from the latest release to make this cute pocket. You want my Via, don't you! Def yummy! Anyhow, instead of folding the top flap back to close the envelope I folded it the other way, as a decorative top. Then I cut another piece of paper just getting the top part of the die. I cut it to perfectly fit over the other, and boom...you have a cute edge! 
 
 
I cut one of the tags from the Build A Banner set and stamped the Brew and caldron along with some hemp and a rhinestone. Also added a bit of white gel pen. I also put some bling in the bottom corner of the pocket. 
You could probably find a variety of things that will fit in this envelope to give as treats, but I LOVE these and it's perfect in this cute envie!

Here's links to what I used.


So, there you have it. Easy peasy! Pick out your favorite papers and MCT products and whip up some cute treats of your own.  Hey, why not even leave the mail carrier a treat! He brings you all these goodies anyway!
Happy Crafting!


Monday, October 21, 2013

Halloween Hustle...


Welcome to our 5 days of "Halloween Hustle"! Yep, we will have 5 days worth of last minute ideas to trick your treats!  You will ALSO see 3-D projects, home decor & even cards!  I hope you are ALL ready for some HALLOWEEN HUSTLE "FUN"! There will be giveaways all week! Check Emma's blog to see what it will be!  Also, if you missed out on our sale last week! Well....for this weekend ONLY, starting this Friday 10/25/2013 @ 12:01am PST  thru Sunday 10/27/2013 @ 11:59pm PST you can use the code OCT2013 to get 20% off your entire order in my store HERE!  Remember I told you about making a "Teeny Tag Holiday" stamp set? WELL....wait no longer, it will be available this Friday, 10/25/2013  in my store HERE!

Hey there! Welcome to day one of our Halloween Hustle! This is going to be fun! We have lots of quick and easy projects for you for the last minute treats you may want to give. I know you will get lots of really great ideas. Here is something I put together real quick.


Now, honestly these could not be any easier to make! Pick out some cute papers, two dies, and some twine or ribbon. This paper is several years old! Not kidding! Just because it's not the latest stuff doesn't mean it isn't still cute...use up what you paid for. And how cute is that bow! 


I  used the smaller of the new bow dies and it has to be the cutest ever! I wanted some orange bling and I didn't have any...so I got out my clear ones and an orange Copic marker and colored one. One nice things about Copics, you can use them for lots of stuff! Let it dry for a tiny bit and you're good to go! 
This little Bubblegum Treat Box Die can be filled with anything and it's perfect for whenever you need treats.

Here's the links to the products I used.


Tuesday, October 15, 2013

Christmas a bit early...

Here's a simple card I  made using some new Echo Park papers in 6x6 size. It's by Lori Whitlock.
I love when the design of paper makes for a perfect back drop. That's how this piece was. So all I did was cut some die cut ornaments, added a bit of twine and a hint of Wink of Stella.

Thanks for stopping by!


Here's a closer look at the ornaments. I added them with dimensionals and the twine is taped in place on the back side. Then I tied some tiny bows and glued them down with Glossy Accents. See that bit of Wink of Stella? Love that tiny bit of sparkle!


Simple huh?! But I still really like how it looks. Cards don't always have to be hard to be cute!


Pick up some of these cute supplies and make some easy peasy cards of your own!


Friday, October 11, 2013

A Basket of Posies...

BLOG HOP GIVEAWAY!
For our blog hop giveaway, we will have 2 winners! 
Winner #1 ~  $50 gift card to "My Creative Time's Store'! 
Winner #2 ~ will be our "Guest Designer" for our Next Release! 
All you have to do is leave your comments on our blogs! You are NOT required to comment on ALL blogs, but the more you comment on, the better chances you have! 

GOOD LUCK! :)


These are the three new sets that I used in my project for the hop...along with several of previous releases.

Blog hop day is finally here! I trust that all of you have enjoyed the Sneak Peaks and got lots of inspiration. I know I did! So, that brings us today...our Blog Hop! I have a cute project for you today, and hope you get inspiration from it as hopefully, you have from my other projects. So, here it is.


I used an SVGCuts file to make this little bushel basket. And I jazzed it up with stamps and dies from Miss Emma. 


Here's a close up of the rosettes I made using both of the dies. The small one and the medium one. I die cut all the leaves from all the different dies Emma has. I had some burlap embellishments from Little Yellow Bicycle and tucked several here and there. I used a wood button on the front with twine. All are added with hot glue.


I glued a couple of the burlap and leaves onto long pins and glued those sticking up above the rosettes. 


Don't know why, but I love the stamp that says Gratitude...and I used it again...lol! I stamped it on the ticket die and layered two of those together, and added some more leaves.


I stamped a couple pumpkins on kraft cardstock and hand cut them out. Doesn't show real well, but added Wink Of Stella glitter pen on them.


I added burlap ribbon around the basket and made little handles with it as well. I hot glued brads on to look like nails. As you can see, I wrapped the flower pot with some straw to hid the ugly black plastic pot.

So, there is my decked out flower pot. I hope you like!  Here is a list of what I used.

Holiday Tickets ~ New Release
SVGCuts
So, for the next stop on your hop, you will visit Cindy's blog here.


Thursday, October 10, 2013

Gift Card Holder Card....

Sneak Peek giveaway!
We will be giving away the set we are showcasing each day to ONE lucky winner! For example, the set we are showcasing on Monday, we will announce the winner of that on Tuesday & so on......
ALL you have to do is leave a comment on each of our blogs! You are NOT required to comment on EVERY SINGLE blog, but the more you comment on, the better chance you have for winning! 
For EXTRA entries, you can spread the word about this release on Facebook, tweet about it OR even instagram it! #mycreativetime!
GOOD LUCK EVERYONE & let's start spreading the word! ;)

Can't believe it's day 3 already! I have been real enjoying all the amazing ideas the DT has been sharing....haven't you?! 
Today, I have a card to share that holds a gift card inside.  So here is the card I made.


I used lots of dies on this card...lol...but I couldn't stop, lol. Anyway, I made a pocket that has lots of hearts coming out, with a birthday sentiment. I cut several of the hearts using a die and popped them up on dimensional adhesive for depth. The pocket is also popped up to get the hearts under the edge. I made the banners simply by cutting the flag end my hand...I needed them a bit longer.
 
To make the background, I cut the larger label die out of patterned paper and layered it over the yellow. Then I cut the stitched label die out of the blue and popped it up on dimensionals in the open space. I added the pocket on top of that, and placed the hearts.


Here is the inside. It's like there is a mountain fold in there to cut a slit in, that the gift card will slip right into.  Cut your cardstock to 5.5 x 11. Score in half at 5.5. Then score at 4.25 from each end. Fold in half on the 5.5 line. Then fold each 4.25 over to be the front and back of your card. Use a strong adhesive tape just at the very left edge and the two ends of the card to keep that edge closed, this will still allow a pocket to be accessed from the inside. The inside should have the mountain fold that you can cut a slit in to hold the gift card. Hope that makes sense. I used the envelope die to hold the gift card. Added the stitching stamp and sentiment. 


Here is the back side of the envelope. I used a 6x6 paper pad for this card and the envelope die is just a tad bigger. So to be able to use that paper, I had to add a bit to the one edge after I cut it for it to be able to close right. But, I actually like the strip of contrasting paper that ties it to the card. I added small foam dimensionals under the closures to be able to wrap the twine. 

So there it is. Here is a list of what I used.

Scallop Stitched Envelope Die ~ New Release

So...hope this card gives you some ideas and you try one of these, too! I know there is no shortage of ideas this week....so....Happy Crafting!


Wednesday, October 9, 2013

Pretty Hair Bows...

Sneak Peek giveaway!
We will be giving away the set we are showcasing each day to ONE lucky winner! For example, the set we are showcasing on Monday, we will announce the winner of that on Tuesday & so on......
ALL you have to do is leave a comment on each of our blogs! You are NOT required to comment on EVERY SINGLE blog, but the more you comment on, the better chance you have for winning! 
For EXTRA entries, you can spread the word about this release on Facebook, tweet about it OR even instagram it! #mycreativetime!
GOOD LUCK EVERYONE & let's start spreading the word! ;)
 
Aren't you just loving the new release?!!! Amazing stuff, right?
Well, for today I made something for my grand daughter. Her Mommy has lots of cute hair bows and they can end up everywhere! But, I bet no one else ever has this issue, right?! 
The thing is, my daughter and grand daughter have moved from our home and all her cute hair bows went with them. But, I wanted to share my project anyway. A cute way to organize her bows for where they are living.


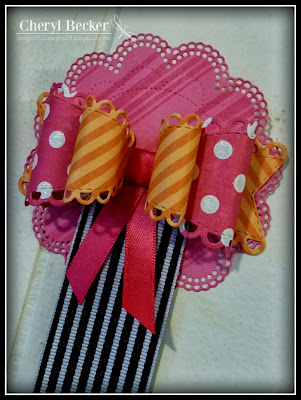
I used the doily die to build on and created this cute hair bow holder with the new dies. I'm totally in LOVE with these!!! And honestly, I might just make her a bunch of hair bows using cute designer papers. Heck, if they don't last long, just make some more. And she is a stunning model for NeNe's homemade hair bows.
 
 
Here's a little close up of my bow. I wish it showed up better, but I colored in all the white dots with my Wink Of Stella glitter pen. It adds just that little bit of sparkle. I wrapped the center with satin ribbon and made some tails as well. 
 
 
Here's the length I made mine... but you could you could make it whatever length you want. On the back side of the doily, I added a piece of satin ribbon to hang in on a hook. I wish I had a bunch of bows to put on there to show you...but I don't even have one of hers here anymore. But I think you can get the idea. I must say....this dang little bows are going to be well used....totally in love with them!
 
So, here's the list of products I used.
 
Medium Stitched Scalloped Bow Die ~ New Release
Small Stitched Scalloped ~ New Release
 
 So...enjoy the rest of the Sneak Peaks! The inspiration from the DT is equal to none other and I know you are getting tons of inspiration...so enjoy!