Monday, February 10, 2014

Valentine Day Party....

I wanted to do something special for my grand babies for Valentines Day. I am going to have a really fun lunch with them....I care for them in my home every day. I thought it would be a fun time for them, so I set about to create a few things ahead. Everything they eat will be heart shaped or in Valentine color theme. I have pink pancakes with chocolate chips for breakfast, heart shaped grilled cheese for lunch, and fun cookies, candies, and treats for throughout the day, and to send home with them. Will be fun!


Here's the table I have set up for them. It has been a real challenge to keep them out of all this while doing the photos. Many tears were shed...I know, I'm so mean....lol! 

I also grabbed some shots of the individual items.


This is the silverware pocket for Miss Aleida.


Here is Mr Karson's. 


I made Fleurette Bloom's cute little box from a Christmas set but used Valentine papers and it came out really cute. Filled it with kisses and coins of chocolate. They've already had a taste of those, lol.


Cute cupcake wraps for a really good cupcake! Glad they are going home after all the sugar today. But hey, that's what NeNe's do!


This is the cup from the Valentine set, but I used hot glue to put the lid on the bottom instead of it being a lid. Made it a bit more stable for holding the candy tubes.Topped them off with the circles and hearts, and an airplane die I have...gotta give Karson something boyish...lol.


Not everything is food...lol. I got some pencils and cut the files to go along. These kiddos love writing and I know they will love having them. Karson...do not write on your Mommy's wall again!

So, there it is. My Valentine Day party for my little kiddos. I know they will have lots of fun...and so will I. That's what crafting is all about...having fun!


Thursday, January 30, 2014

Valentine Day Treats....

So, I whipped up a cute little pocket to put some treats in. I simply welded three tags together in Sil Studio Software. I scored in between them, cut down those two score lines about two inches, and folded that flap down, towards the front. Then just simply fold one tag over left and one tag over right. You might have to trim a tiny sliver off so they fold nicely. I used Scor Tape to keep it closed, one on the bottom and another on the edge. The digital papers were printed double sided so you can see pattern when you fold that front flap forward. If you don't want to do that, you could always stamp something on the white when you fold it down. Either way, it will be super cute!


Aren't they so cute?! I flood filled these with the new papers from Fleurette Bloom...such cute papers! I decorate each in different ways using some dies from My Creative Time and Simon Says Stamp. I did a lot of inking, added white gel pen accents, tied ribbons, used Wink of Stella glitter pen too. As you can see, you can put a variety of things in them...just not a large amount. 


Starbucks VIA fits in very nicely. Used MCT dies on this one.


On this one I used MCT dies and some stamps from SSS. Tied some ribbon and added some dots.


For this one, I used some dies from SSS, seam binding ribbon, Wink of Stella, and some tiny enameled dots. The candy is Nerds candy in one of the cello packets from Clear Bags.

So, there you have it. Cute and simple...just perfect for a little something. BEWARE: Fleurette Bloom will be having some new cut files for these very soon....so be watching!

Tuesday, January 28, 2014

With Love....

Here's the last of the cards I made this past weekend. I needed more of this type and really like how this came out. I have lots of 6 x 6 paper pads that I need to use up. This is a good way.


To get the background for this card, I used one of the edge dies from My Creative Time. I cut several strips of varying widths. I inked the edges of each. Next, I began to add them all onto a piece of cardstock sized to 4 x 5.25.  I also added some stamped stitch lines to all four sides.


To finish off the card, I cut the flowers with a die, inked the edges, and used a brad to hold together. I cut the label die, stamped the sentiment, and inked the edges. I scattered a few tiny pearls around, added some foam tape, and attached the panel to the card base. I hope you like it!


Monday, January 27, 2014

Donut You Know...

I found this cute little donut file in the Fleurette Bloom store and knew right away what I wanted to do with it. I had seen this funny pun once and thought it would fit for this card.


I created a very long and skinny triangle in my Sil software and then filled them with some of the new digital papers by Fleurette Bloom, called Heart's A Flutter. So cute! The I covered a 5 x 7 piece of cardstock. I cut the words as well as a shadow layer for them. Also filled the donut with one of the digi papers. I used foam squares to pop it up, tied some twine, added white gel pen accents and some super cute googly eyes. I ended up trimming the pattern piece to 4.5 x 6.5, matted it on black 4.75 x 6.75, and then layered that on the 5 x 7 card base.

To get the donut center to be a heart, I released the compound path, ungrouped, and got rid of the circle...deleting it. Then I got a simple heart out of the Sil library, and centered it into the donut and then made it a compound path. I then did the same heart as a shadow and put it on the black layer...so it would show through underneath.

I hope you like my take on this cute little donut. Head over to Fleurette's store and check out all the cute stuff!

Thinking of You...

Here's another card from the weekend...Thinking of You. 
Again, using the card kit from this month over at Simon Says Stamp. I love each of the papers that were included...and the stamp set is awesome too!


I used some Tim Holtz markers and a water brush to get a bit of water color look on the flower. Then I went over it with my Wink of Stella clear glitter brush. I added some tiny bright pink pearls, tied a rustic bow, and called this one finished. 


If you look close, you can see the teeny tiny pink pearls in the centers of each flower. I'm happy with how this came out. Simple and clean...and nice and bright!

Thanks for coming by!


You Are Loved....

Trying to build up my card stash for specific type cards. Here is one I did this weekend. I used products from Simon Says Stamp card kit. Love this stamp set!


I love the look of the outlining of the flower head. I purposely did it twice, once off set a bit. And I like the look of the leaves...stamping once, then stamping again...getting the shadow look. Having been a really rough winter here in Ohio, I was ready for vibrant colors in anticipation of Spring.


I chose some enamel dots and scattered a few around the card. I also white embossed the sentiment. Thanks for stopping by!


Thursday, January 23, 2014

Yahoo!!! New blog....

Wow!!! I have a brand new look!!!

I am so super duper excited!!!! Miss Veronica from VKDesign Company did an outstanding job. This is so what I had in my mind and she so perfectly put it all together.


Soooo....in celebration....I'm doing a give away. I will be giving a gift card to Fleurette Bloom's store for you to pick svg files or digital paper files. Here's what you have to do.

1. Go to Fleurette Bloom and like her page on Facebook.
2. Leave a comment on this post.
3. If you don't already follow me, please follow!

I will draw the winner on Friday of next week, January 31.
 I will be checking when I choose a winner, if you did indeed go to Fleurette Bloom and like her. If your name doesn't appear on her site, I'll choose a new winner. 

Ok....now....leave me some love on this new look!!! It's all because of Veronica's awesome work!!!

Friday, January 17, 2014

Blog Hop Day...

***BLOG HOP GIVEAWAY***
For our blog hop giveaway, Emma is giving away a $50 gift card to the "My Creative Time" store to ONE LUCKY winner! ALL you have to do is leave a comment on each of our blogs! You are NOT required to comment on EVERY SINGLE blog, but the more you comment on, the better chance you have for winning! VERY IMPORTANT, PLEASE leave a way for us to contact you w/your comment just in case "YOU" are the lucky winner! 

**EXCITING NEWS**
Since Emma didn't get to celebrate her 3rd year Anniversary in December (2013), she decided to celebrate it this month w/an EXTRA SPECIAL "FREEBIE" for THIS WEEKEND ONLY! YEP, for the FIRST TIME, the freebie will be a "DIE & a stamp"! So, you will get THIS ADORABLE set in your packages w/your purchase for THIS WEEKEND ONLY starting Fri, Jan 17th thru Sun Jan 19th ending at midnight PST! If you miss out on it, Emma will have it available for purchase in her store on Mon. Jan 20th


So...here is my card I made for the blog hop. I love it and hope you do too!


I LOVE how this card came out! First off, I cut the snowflakes from different glitter papers by American Crafts...my fave! You've seen many posts in the past of  this glitter paper. It's amazing stuff!!! So soft and smooth, and oh so very glittery!

Then I used those same dies, and cut them in various places on the front of my white card base. BEING VERY CAREFUL TO KEEP EVERY TINY PIECE!!! I turned that over and worked from the back side. First off I pressed the glittered snowflake into the cut on the card base. Then VERY CAREFULLY, I used my tweezers and took out every tiny piece of the white and put it back into place in the snowflake, still working from the back side.


Very time consuming and I used Scotch tape as I went along. I did this for each and every snowflake. When you flip it over, you can see the great look you get!!! I absolutely love this card! It's like inlaid glittered snowflakes...so pretty! Here's the inside of the card.


I mounted the base onto a piece of the blue glitter paper. Then I used foam tape and attached it to the card base. I stamped my sentiment and hand cut the flag end. I did the same with some green glitter paper only a bit larger to show underneath. I added foam tape and added it to the front of the card. I hope you like it. 

Here's what I used.

You're So Cool Stamp Set ~ New Release
Winter Flakes ~ New Release

If you need to go the beginning of the hop, start here at Emma.


Tuesday, January 14, 2014

Sneak Peaks Day 2...

***Sneak Peek giveaway!***
We will be giving away the sets we are showcasing each day to ONE lucky winner! For example, the set we are showcasing on Wednesday, Emma will announce the winner of that on Thursday & the sets we are showcasing on Thursday, Emma will announce that winner on Friday in her video!
ALL you have to do is leave a comment on each of our blogs! You are NOT required to comment on EVERY SINGLE blog, but the more you comment on, the better chance you have for winning! VERY IMPORTANT, PLEASE leave a way for us to contact you w/your comment just in case "YOU" are the lucky winner! 
For EXTRA entries, you can spread the word about this release on Facebook, tweet about it OR even instagram it! #mycreativetime!
GOOD LUCK EVERYONE & let's start spreading the word! ;

**EXCITING NEWS**
Since Emma didn't get to celebrate her 3rd year Anniversary in December (2013), she decided to celebrate it this month w/an EXTRA SPECIAL "FREEBIE" for THIS WEEKEND ONLY! YEP, for the FIRST TIME, the freebie will be a "DIE & a stamp"! So, you will get THIS ADORABLE set in your packages w/your purchase for THIS WEEKEND ONLY starting Fri, Jan 17th thru Sun Jan 19th ending at midnight PST! If you miss out on it, Emma will have it available for purchase in her store on Mon. Jan 20th!


For today's project, I made a tag. This will go on to a special friend for Valentines Day.

I cut this tag out of kraft cardstock and then again out of designer paper. Then, I picked several patterns out of the same pad and cut  varying width strips. I then lined them up on my cutting pad, directly butted up against each other. Then I placed the die on top and cut again. This gave me strips that had the stitching on the edges and I placed them on top of the tag. This gave a very nice panel in the center of the tag on which to put my main element. 


I stamped both of the hearts and then hand cut them out. I added a foam square to the smaller one and layered it on to the larger one. I stamped my sentiment and hand cut the flag end...I wanted it to look like an arrow. Then I cut a shorter piece of white from that same strip, and cut the "arrow" end. I tucked the ends under the heart, making it look like an arrow going through the center of the heart. The point end of the "arrow" looked like it was bare, so I added some tiny hearts to that end. I cut very tiny pieces of foam tape and popped them up. I then used my Wink of Stella clear glitter brush to add some shimmer.


I then added foam dimensionals under this element and added it the front of the tag. I picked out some lace ribbon from my stash, doubled it up, and tied it into a bow at the top of the tag. I then used a piece of hemp to tie on a string to attach with. I hope you like my tag, here is what I used.

Puffy Hearts Just For You ~ New Release


Monday, January 13, 2014

Sneak Peaks Day 1...

***Sneak Peek giveaway!***
We will be giving away the sets we are showcasing each day to ONE lucky winner! For example, the set we are showcasing on Wednesday, Emma will announce the winner of that on Thursday & the sets we are showcasing on Thursday, Emma will announce that winner on Friday in her video!
ALL you have to do is leave a comment on each of our blogs! You are NOT required to comment on EVERY SINGLE blog, but the more you comment on, the better chance you have for winning! VERY IMPORTANT, PLEASE leave a way for us to contact you w/your comment just in case "YOU" are the lucky winner! 
For EXTRA entries, you can spread the word about this release on Facebook, tweet about it OR even instagram it! #mycreativetime!
GOOD LUCK EVERYONE & let's start spreading the word! ;

**EXCITING NEWS**
Since Emma didn't get to celebrate her 3rd year Anniversary in December (2013), she decided to celebrate it this month w/an EXTRA SPECIAL "FREEBIE" for THIS WEEKEND ONLY! YEP, for the FIRST TIME, the freebie will be a "DIE & a stamp"! So, you will get THIS ADORABLE set in your packages w/your purchase for THIS WEEKEND ONLY starting Fri, Jan 17th thru Sun Jan 19th ending at midnight PST! If you miss out on it, Emma will have it available for purchase in her store on Mon. Jan 20th!


So, here again we have another great release from Emma. I'm sad I didn't get back on MCT Design Team, but Emma has invited me to guest design on this release.

So here is my project I made.


I stamped the cute little snowman onto patterned paper and cut out by hand. Same with the hat and scarf. 
I then stamped the snowman again onto the white background so I knew where to place him, plus his arms could not be cut out. I then stamped the arms so they would show when I attached the element. I hand cut two pieces of white to look like snow drifts and inked the edges a bit with a very light blue ink. Also stamped the snow falling in the background. 

I added some foam tape to the back and attached the snowman into place. I stamped the sentiment and then layered this piece onto some blue cardstock. 

For the card base I used the 3x3 Trifold Card Die. However, I folded it in half instead. Then, I cut it again in the dotted paper and attached it up a bit from the white edge and trimmed it off at the top, right at the fold. Then I wrapped some hemp cord around and tied into a small bow. I then added the element to the front of the card.


For the snowflake, I cut it out six times and glued them all together to get  more of a chipboard feel to it. I covered the front of it with Wink of Stella clear glitter brush, which gave it a nice sparkle. I glued it to the edge of the element. I did the same thing for the snowflake on the envelope. 

I measured my card and use my envelope punch board from We Are Memory Keepers. I found the coordinating size and followed the directions for making an envelope. For the tag on the front, I stamped my sentiment, and hand cut the end into a flag. I glued it down and added the snowflake to the end. This card measures approximately 3 x 4.

Here's the products I used in this project.

You're So Cool ~ New Release
Winter Flakes ~ New Release


Friday, December 27, 2013

Bring on the New Year...

Happy New Year everyone!!! I hope this year brings only good things into our lives. We are ready for a "no drama" year!!! The end of the year brought great things and believing this new one will be even better!

Here is a simple card I made using some new digital papers by Fleurette Bloom. I used two of them and a couple files from the Silhouette store. 


I printed the two black and white papers by Fleurette Bloom and layered them with my fave ever glitter paper by American Crafts. I get mine at JoAnn's. I love how sparkly it is and so very, very smooth...and NO FLAKING OFF!!!


I found this sentiment in the Sil store, as well as the top hat. I just created another layer for the hat and cut it in the glitter paper. I also added some green gems. I put the hat on an action wobble. Those things are fun! It just wobbles, wobbles, wobbles! I also took a bit of twine to wrap around and tie a small bow.


As you can see, I layered another piece of the patterned paper on the inside and used a stamp from My Creative Time. It was perfect for the inside of this card. And so I say to each of you....
Cheers To A New Year!!!

Just a simple card, but thought you'd like it anyway. Head over to Fleurette Bloom and check out all her svg files and digital papers. You'll find something, I know you will! And don't forget about My Creative Time as well.

Here's what I used.


Happy Crafting and Happy New Year!


Monday, December 23, 2013

Glitzy Snowflake Shaker...

Here's a shaker card I made...always loved how Nikki Navy Wife made these, and finally got one to look right. I always had the stuff inside stick to the edges of my foam dimensional tape. This time I took a small brush with some baby powder and dabbed it on those exposed edges of the tape, and no sticking!!!

I cut the top from American Crafts glitter paper. Love that stuff!!! It is so sparkly and does not flake off!


I used on of My Creative Time's dies to cut the window mat. I used two layers of foam tape around the window area after adding acetate to make the window. I made a small pile of my sequins and glitter and carefully put down the window mat, centering as best as possible.

Next, I die cut several of the small snowflake from a Simon Says Stamp die using the same AC glitter paper. I also cut more of Fleurette's snowflake using my Cameo. Then I cut them in half and tucked around the edges, gluing down with tiny dots of glossy accents. 


So pretty! I also stamped my sentiment from a My Creative Time set and embossed with white embossing powder. Again I used a bit of Glossy Accents to glue down. I have some tiny holographic stickers from who knows where, and I scattered a few of those around for added sparkle. 

I hope you like my card. Check out the store at Fleurette Bloom for this snowflake and many other great files....svg files and digital papers!


So, there it is, a very pretty, very sparkly, very fun...shaker card. I hope you check out these products and create one of your own.

Friday, December 20, 2013

Farewell Blog Hop...

 "Welcome to our "Farewell Blog Hop"! We are doing this hop to HONOR & send off our "Current design team" in a fun way. Since all of us have become friends, we are doing our LAST blog hop together making it a "Friendship"  theme.  I hope all of "YOU" thoroughly enjoyed this team as much as we did! Since this is a special day, there will be a giveaway at EACH STOP! Yep, that means we are having a total of 19 giveaways! All you have to do is leave your comments in order to qualify! Emma will announce all the winners on Monday, 12/23//2013 on here blog! Here is what I am giving away today:


I have had the year of my life, working for Miss Emma with this awesome Design Team! It has truly been an honor, and I thank Emma from the bottom of my heart for this opportunity. And I thank you guys, for all the wonderful comments, for supporting and following my blog. It's been so much fun sharing my ideas with you, and getting ideas as well. This is an amazing group of women! Such talent!
Anyway....on to my last post...a card. Our theme was friendship....appropriate as this team really has become great friends. Friendships that will last long beyond the DT term. So, here's my card for you today.

 
I used the 4x6  journal die to cut the plaid paper mat. Then, I cut the red piece a 1/4 inch smaller used my atg to adhere. Then I came up with what I wanted it to say. I used the label font stamp set and stamped each letter in green ink. I cut each letter out and used foam dimensionals to adhere. I used my Wink of Stella glitter brush and went over each letter to get that great glitter. Love that thing...use it a lot!!!


My gingerbread banner represents each member of our team. Hand in hand, lol. I created a mat layer and offset it just a bit to show better. I also added it with some dimensionals. I have some glaze pens, and used the green and the clear one to add a bit of shine to the eyes, mouth, and buttons. It just needed something!


I chose my stamp and used white embossing powder to make it look better with the white on the gingerbread men. I mounted it on a bit of green cardstock.


For my finishing touches, I added white gel pen stitching all the way around, and tied some twine. Actually, the stitching was done first thing so it could dry while I worked on the other elements. 

I hope you like my card. Simple, but yet sends my feelings perfectly. I hope all of you guys who have followed me, will continue! I have loved reading all you kind words, Not going anywhere, I'll still be crafting, and I'll still post links of FB so you can see what I'm up to. I wish all of you the Merriest of Christmases and the Happiest of New Years! 

Here's what I used.


***SALE ALERT***
"There will be a sale in the My Creative Time store HERE FOR THIS WEEKEND ONLY starting Friday, December 20th & ENDS on Sunday, Dec 22 @ midnight PST!  
Use code:  FAREWELL2013 to get 25% off all IN STOCK ITEMS ONLY!!!

Your next step on the blog hop is Cindy.

Have fun hopping, and until next time....HAPPY CRAFTING!!!

Friday, December 6, 2013

5 Days of Christmas....Day 5

Well...today is the final day of our 5 Days of Christmas ideas for you. Wow....I'm blown away by the creativity of this team...and our awesome leader...Emma! Such cute projects this week, ladies!

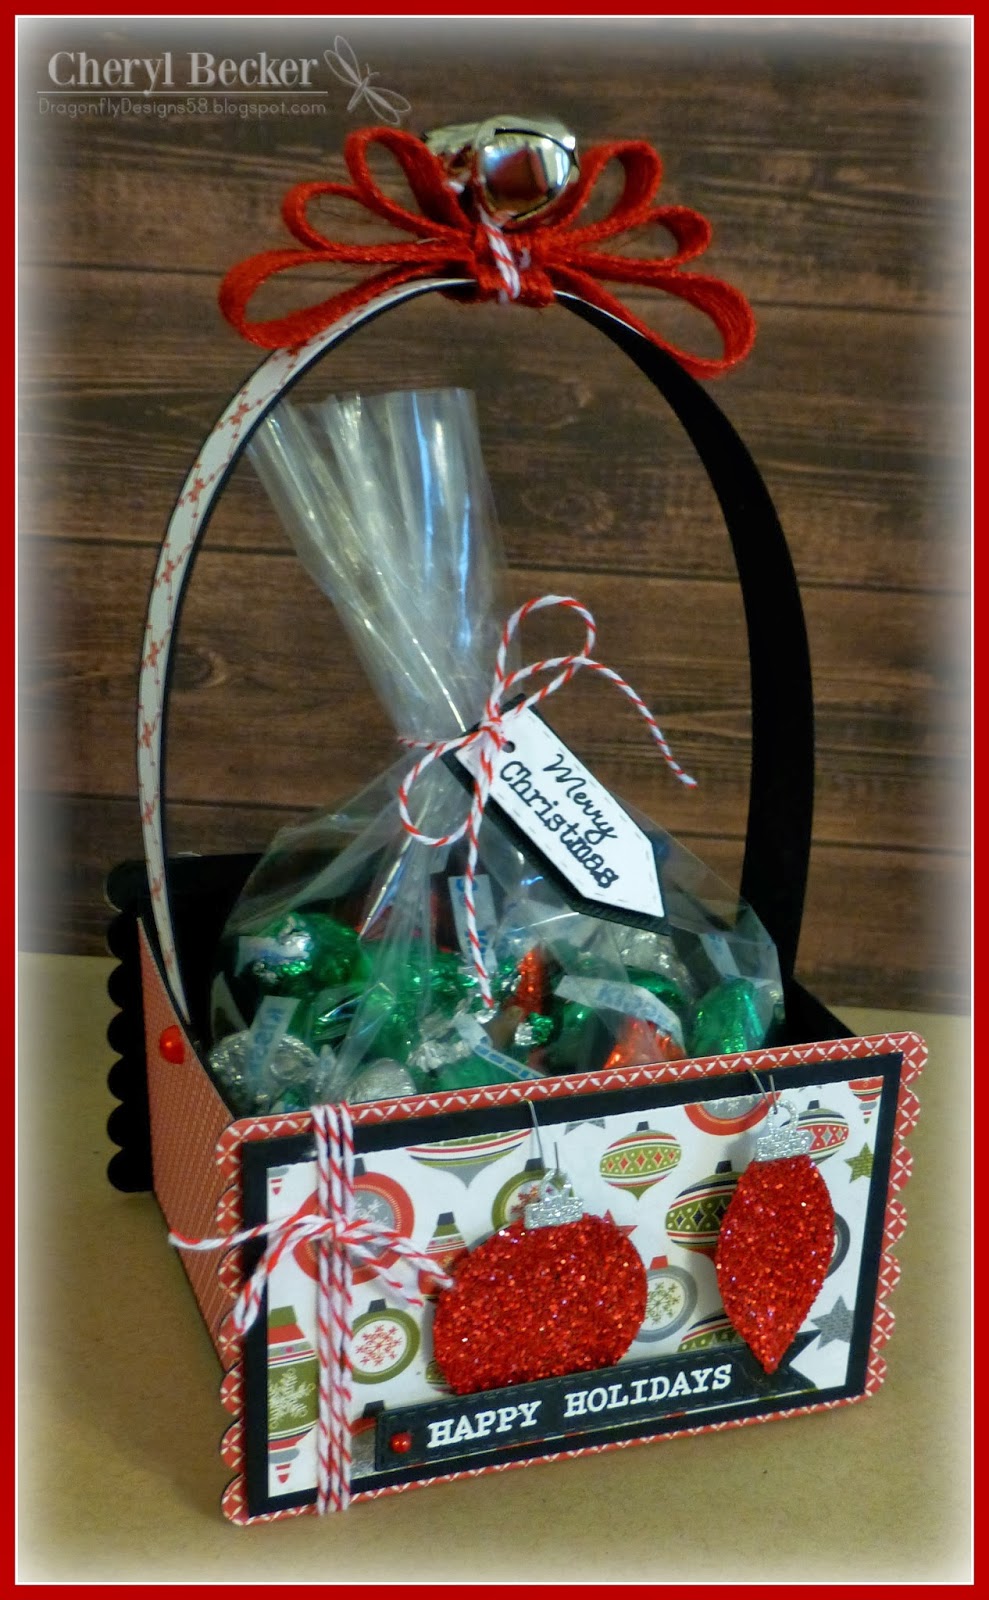
For my project today, I created a little box using one of the large label dies. If you recall, the other week I make a small luminary with one of the smaller tags, and made a little box for the sides to adhere to. You can find it here. Well today I did something similar, just on a larger scale. 


Here it is! Cute, right? I love how it came out. If you look, you can see I used the large scallop tag die. I just cut it once, then rotated the die, lined it up just right, and ran it through to get the scallops on the opposite edge too. Then I cut a black mat, and a patterned paper layer, and adhered to the tag piece. I made two of those.
I created a simple box, scoring and folding, and gluing the flaps together. The just glue your decorative panels to that box.


Here is how I did mine. I used the ornament dies and covered them in glitter. I even took fine wire and bent in to look like ornament hangers. White embossed my sentiment and wrapped some twine. Used dimensional adhesive for added interest.


I added my candies and used the teeny tag dies with twine to tie the bag closed. So create the handle, I just cut a narrow strip in black and added a bit smaller strip of designer paper. I hot glued it on the inside and added a red pearl on the outside.


I made a simple bow by layering loops of burlap ribbon, glue them on top of each other, and then hot glue it to the handle. I tied on a couple of jingle bells on using the same twine.

Here's what I used.


So, there you have it. A simple little box can become very pretty when you add some of Emma's super cute products! I hope you had fun this week seeing all the cute projects. Hope to see some of your goodies too. Happy Crafting!

Wednesday, December 4, 2013

Five Days Of Christmas...Day 3

Over at My Creative Time we are doing 5 days of Christmas ideas for you. Hope you are getting some great ideas for some last minute gifts or treats or cards or decor. The sky is the limit when you use MCT products!

I made a pretty ornament for you today. Well, it's a sorta big ornament or it could be a little decor piece to hang in that perfect little spot. 

I used a svg cut file for the base of the snowflake and then, of course, jazzed it up with MCT products.


I used my favorite sparkly glitter paper from American Crafts.....LOVE that stuff! Anyway, I cut my top layer from that and the bottom layer is from some patterned paper.  


I used the large rosette die and cut my polka dot paper with it, and assembled. I use hot glue to glue it to a circle on the back to hold it in place. Then I hot glued it to the center of the snowflake. 

I also used the scallop and stitched circle dies. I stamped and embossed with white embossing powder, the sentiment in the center of the circle. It is from the new stamp set called A Day In December....love that set!!!

 
  I added foam dimensionals under the scallop but I also used hot glue to attach it to the snowflake. I don't want it coming off!!! How pretty is all that sparkle?!!! And it does not flake off....it isn't even rough like most glitter paper. Very smooth, and cut great in my Cameo, and didn't ruin my blade!

I love how this came out and you should really make some of these. Very easy to make, but a very impressive display. Anyone would love to receive one of these!!!

Here's what I used.

My Creative Time
Scallop & Stitched Circle Dies
Scallop Stitched Rosette Dies
A Day In December Stamp Set
SVGCuts - Snowflake file

I hope you like my project for  you today. Enjoy the rest of the week of ideas.and have fun crafting!