Sunday, December 9, 2012


And another round of hopping for the 12 days of Christmas! I am loving all the great projects, aren't you?!

So here's what I did for today....a 3D Christmas tree! I started out with a simple cut file for a cone. You could use a file for a party hat or you could even get a styro foam one from the craft store. Then I set out to cutting LOTS of the Stitched Oval Die. Then, just start adding them in rows, and stagger each new row so the points aren't directly over the one below it. As you near the top, you will have to cut them shorter and trim the cut off end to a point or they won't lay very nice. After I got all the way to the top finished, I went back and tucked pieces in where I felt they were needed...where there were gaps. This entire project is just to your satisfaction. I don't know how full is full for you...if you see a spot that needs one, then put one. If you're satisfied then stop. I will say, when I went back to fill in, I had cut each oval in half. You don't need that much length.


After I had it as full as I wanted it, I had to hide the mechanics at the top...it isn't very pretty under there...lol! So I cut one Scallop & Stitched Circle Die. I cut in to just the center and cut one scallop out. Then overlap and glued to make a cone shape. I used hot glue to add it to the top. It looked a bit too open right under there so I used a Martha Stewart punch...the fern looking leaf...and tucked a few around to soften it a bit.


I also stamped and hand cut out some holly leaves and added some red berries right on the top. I think it finished off rather nice!


It needed some ornaments...lol. So, I gathered up some different colors of Stickles and added dots of glitter all around the tree. It really made a sort of dull green tree, come to life a bit. It just brightened it up. You could add bows of twine...which I was going to do, but changed my mind. That would be cute though. Another thing you could do is run each "limb" through a cuttlebug folder if you wanted to, and add texture. How ever you decide to do yours, it will be perfect. You could do traditional as I have, or go funky...which would be super cute too! I hope you like what I've made for you today. Don't forget to keep hopping and see all the other designers projects. Leave comments for an entry into the giveaway!


Saturday, December 8, 2012

Cutie Patootie Elf...

I'm loving these elves from Peachy Keen Stamps! So easy to stamp and to color. And you get a choice of  just the hand or a hand holding a sucker. So nice to have options! I do not have Copic markers so I used my Stampin Up markers. Well, the face is Copics. I jazzed up her outfit with glitter. It gave it that something something to make it pop a bit. Used my Janome sewing machine to add a bit of texture, tied some ribbon, and popped it up on dimensional adhesives. The sentiment stamp is from our awesome Emma, from My Creative Time. Hope you like!


Wednesday, December 5, 2012

Advent Calendar Using Words


HUGE GIVEAWAY ALERT!
Okay, since it's Christmas, Emma decided to give away TWELVE of her FAVORITE things to ONE LUCKY person! She will announce one of the prizes for each day in her video! So by the 12th day, you will see ALL 12 items that ONE lucky person will be receiving! All you have to do is leave your comments each day! It's that simple! ALSO, **VERY IMPORTANT** Please leave your contact information so we can contact you "IF" YOU are the lucky winner! 


Aren't you loving all the great ideas so far! Amazing stuff! 
Here is my project for day 5 of our 12 days of Christmas. 

My plan was to make an Advent calendar, with the numbers to count down to Christmas. I knew I wanted to use the Build A Banner dies and the new circle alpha stamps. However, I realized that I would not be able to stamp double digit numbers in that small circle. So...I got to thinking what I could do instead. Can you believe that "Wishing You A Merry Christmas" is exactly 25 letters?! Just the amount needed to count down to Christmas day. I was thrilled. Then, when I got to laying out the words themselves, I noticed how exact they lined up for placement...no odd amount...they lined up in rows and columns just like it was meant to be! 
 Anyhow, I cut all the banners, all the circles, and all the emblem shapes first. Then I did all the stamping of the letters. I laid them all out on brown stips of paper, a tiny bit wider and longer for each word to fit. I planned placement of all before sticking down with dimensional adhesives. For each letter, I adhered them with hook and loop tape...so they can come off. Now, if you don't want to do the count down, you can just glue these right down and just use a nice wall hanging. But if you do want to count down, I suggest Velcro...it would be the easiest way.  
I had stamped the numbers for the 25 days on the banner, but you really probably wouldn't need to as they won't show. You can see, the Velcro actually covers them up anyway.
 I used some crinkle ribbon to make two bows for the corners and tied a button with twine. I used hot glue to stick them down. 
But...I didn't like the large empty spaces on the sides. so I cut some fun trees with my Cameo and matted them on a shadow layer in brown. I added glitter to the tops to make them sparkle and shine. I added a cute little tag, tied a bow of twine and added them to the tree. And, used dimensional adhesive to stick down.

For the top, I used the large stamp, Magical Holiday and use a glue pen and sprinkled with glitter to get that "magical" look...lol. I layered it on a shadow piece and attached it with dimensional adhesive too. 
Then, the entire front was glued down to another piece of cardstock, trimmed equal all the way around, and then that was glued to a heavy weight chipboard. I used my CropADial to punch holes and add eyelets for hanging.

I hope you enjoyed my Advent Calendar...with words, not numbers...to count your way down to Christmas Day! I had fun making this, and it seemed to morph a bit as I got into it. I'm sure you've had projects that changed along the way...that's what this did...lol. I'd love to see yours if you decide to make one. If you store it well, you could use it for many years. Merry Christmas, everyone!


Cheryl ~ Me

Saturday, December 1, 2012

Christmas Tags or Ornaments


HUGE GIVEAWAY ALERT!
Okay, since it's Christmas, Emma decided to give away TWELVE of her FAVORITE things to ONE LUCKY person! She will announce one of the prizes for each day in her video! So by the 12th day, you will see ALL 12 items that ONE lucky person will be receiving! All you have to do is leave your comments each day! It's that simple! ALSO, **VERY IMPORTANT** Please leave your contact information so we can contact you "IF" YOU are the lucky winner! 

So...here we go! Ready for some neat gift/decor/card ideas? Cause I know this Design Team won't disappoint! 
For my project to share with you, I made a variety of ornaments/tags you can hang on your tree. Or if you want, you can tie them on a gift. Simple, but I hope you like them.

This tag would look super cute tied on a child's stocking hung by the fireplace. You could even tuck in the child's own list. The green jute ribbon and that pretty button are from Liz's Paper Loft.
Tag Dies

Just Tags Stamp & Die Set
Happy Mail Stamp Set
Warm Holiday Fun Stamp Set

For this tag I used the wood look paper...I love that stuff! It really looks like a frame. Just a matter of layering up some of the stamps and dies, add some glitter and twine, ink the edges, and you're done! Now how easy was that! You could make your gifts look really nice adding tags like these.
Scallop & Stitched Circle Die
Tag Dies
Just Simply Live Stamp Set
All Around Christmas Stamp Set

This one is really fun. I used a fun fiber ribbon and made a fan shape with it. Added the scallop and stitched circle dies and layered it on the frame. It's cool with the see through look to it. Also the hot pink is a fun color. I added a bit of white gel pen stitching around the frame to tie in the white of the tag.

Make sure you see what the other ladies have made today! I know you will be glad you did. You can start at Emma's blog, and hop on from there.
Emma
Cheryl ~ Me

And if you want to shop in Miss Emma's store for more awesomeness, here is where you need to go. I know you will find lots of things you'll want or to give as gifts. Shipping time is fantastic, so you still have time to shop!

Monday, November 26, 2012

2012 Christmas Card? Maybe....

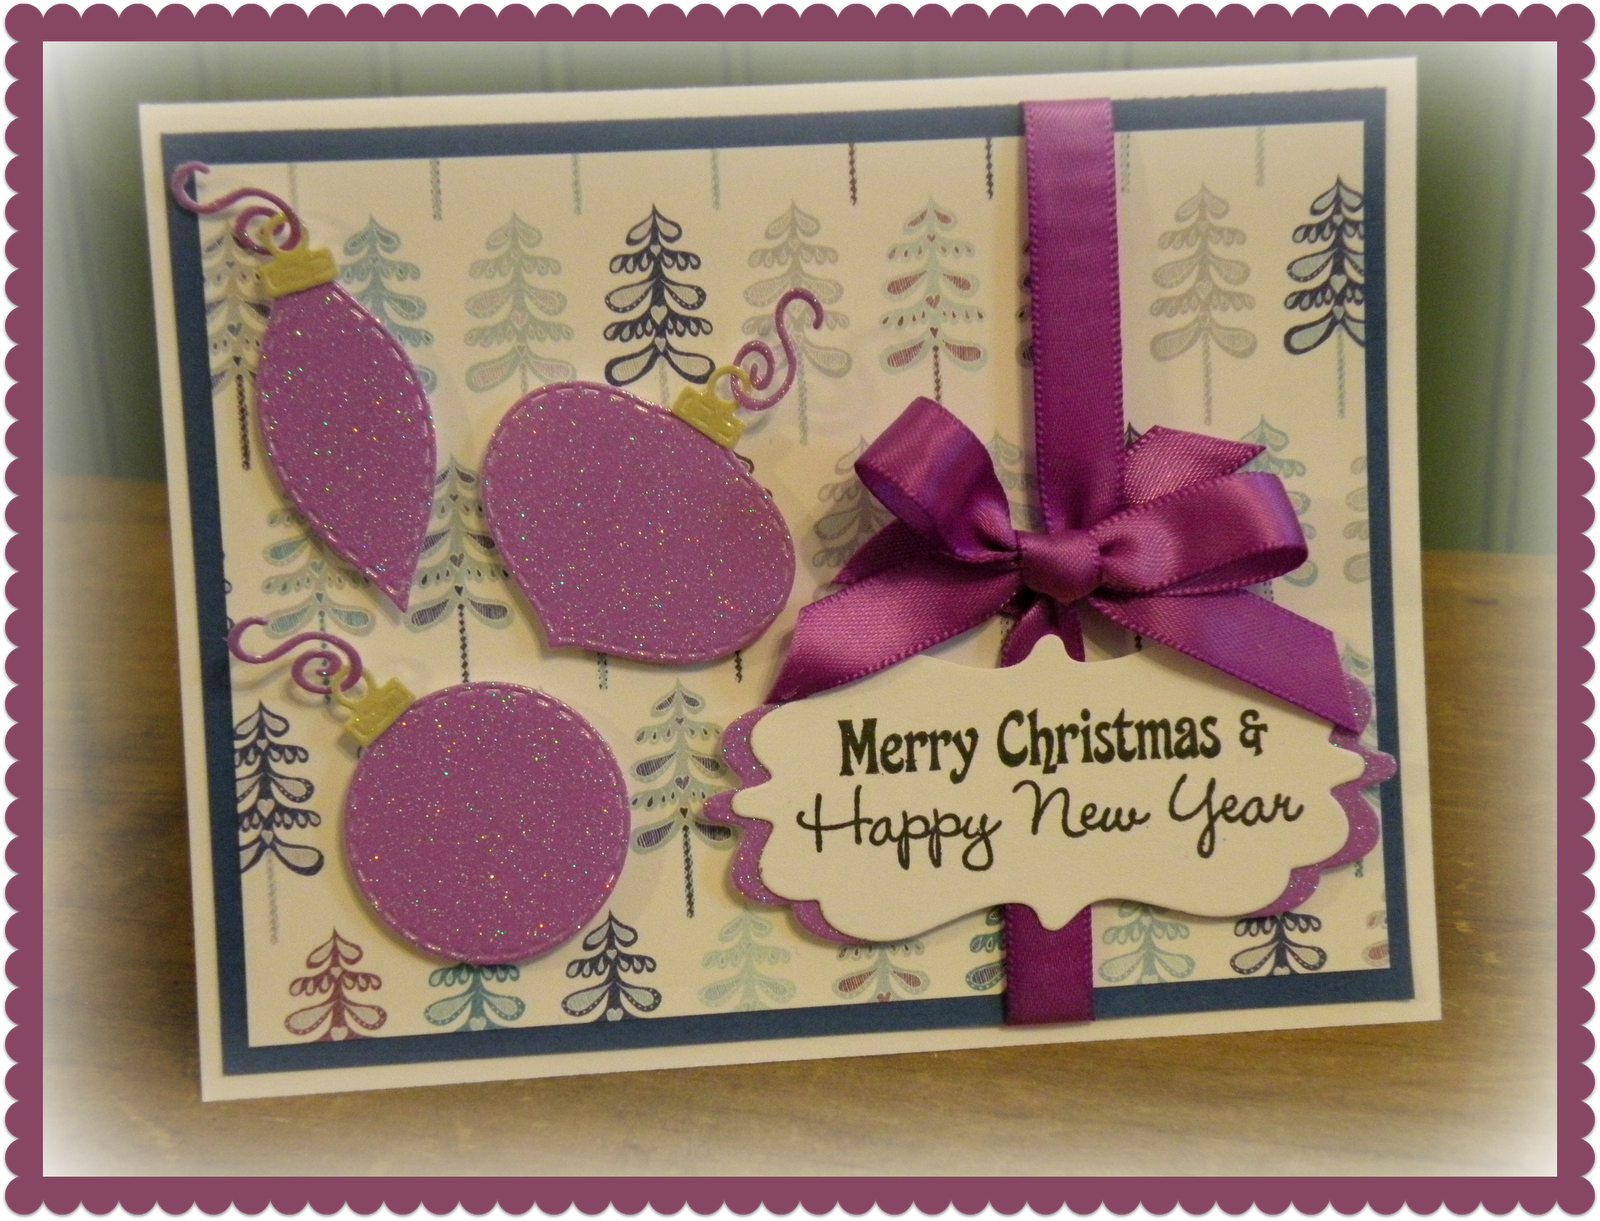
Been playing around trying to come up with my Christmas cards for this year. I don't usually do traditional....this year I had papers in blues, lavender, and purples. I thought this look really pretty....so this might be the winner!

I used glitter paper for the ornaments. They cut out great using the dies from My Creative Time. The tiny tops and hooks cut much nicer using the metal shim that Emma also sells in her store. I didn't have much trouble before using that, but it did make a difference and they came out easier and cleaner...they are quite tiny!

I used the Fancy Frame Stamp and Die Set for my sentiment. I just didn't use the stamp part. I cut a second one, cut it in half at the center and trimmed off the parts that would show from behind. Then layered it just on the ends, for that little pop of color. First though, I tied my ribbon around the base layer. I put the ornaments and sentiment up on dimensional adhesive.

Aren't the ornaments pretty?! I think so....in real, they are so sparkly! I'm thinking I like how this came out and it just be the winner for this year. What do  you think? Do you traditional or non traditional colors for Christmas? Change it up this year, do something that maybe you wouldn't normally do...you might surprise yourself!


Friday, November 23, 2012

Snowman box...a'naturel!


Here's a cute little snowman I made on the inspiration of two friends Tamara and Thienly. I printed digi papers and then stamped snowflakes all over with brown ink. A very nice look for that crafty style. I got the file from SVGCuts and incorporated stamps from My Creative Time. I opened the file in Ecal and sized it as big as it would go on the mat. It's a very nice, substantial size. I probably wouldn't fill this one with goodies, cause it will take a LOT! 

New Stitched Dies....LOVE!!!


Thank you for joining us for our very FIRST "MCT Black Friday Blog Hop"! Okay, not only are we having a SALE, but we are ALSO releasing 2 new stitched dies that YOU ALL have been requesting for a LOOOONG time! IF you own the "Curly Label Die" & the "XL Label Die", we now have Stitched dies that will layer on top of those! Are you excited as we all are??? Wait, we are NOT stopping there, I have ALSO had several requests to sell my "Teeny Tag Dies" by themselves (for mass producing purposes) GUESS WHAT???? We now have them selling in my store by themselves! Sit back & please enjoy this hop as we all showcase the BRAND NEW "Stitched Curly Label Die" & the "Stitched XL Label Die" along w/many other MCT products!
Please use the code: BLACKFRI (all caps) to get a 20% discount of your purchase! Sale will end Sunday, Nov 25th @ Midnight!
**GIVE AWAY ALERT**
Well, this wouldn't be a party w/o a giveaway.....right??? Well, we are keeping this simple! Just leave your comments along w/a way to contact you, should you win! Random.org will be picking TWO lucky winners to win $25 worth of MCT product of YOUR choice! GOOD LUCK PEEPS!


 Aren't these new dies to die for....lol! Seriously though, these two layered together give a super cute look, and I can't wait to play with them even more. But, for right now...here are a few things I did with them. Don't forget to follow along on the hop and leave comments for your chance to win!

I'm loving this little die for the coffee cup! And how cute is it layered on top of this new stitched label?! I told you, it gives a really cute look layering them.
Stitched XL Label Die ~ New Release

Here's another great card using the new Stitched Curly Label Die. I love how this card came out! First time I've tried the Keepin' It Classy Stamp Set...and I love them! So cool to be able to choose what accessory to add. I use the oval Nestability in regular and scalloped. It really makes the image pop! And how about that label for that fancy sentiment? The whole card came together really nice.
Stitched Curly Label Die ~ New Release

This card makes me smile...lol! When I saw these in Emma's store I knew I had to have them. My son has a very big beard and mustache and he keeps it neat, combing it a lot. So this embossing folder that came with the comb, works perfect with these dies.  And once again, the little label dies are perfect for the sentiment. I added some brads and called this one done. 
Stitched Curly Label Die ~ New Release


 Ok, one last little idea and then I'm done...I promise. I had gotten some of these little acrylic boxes in different shapes and thought this little pillow box was perfect for making a belly band. I used the XL label die and the new Stitched XL Label Die. And of course the All Around Christmas Stamp Set. I crinkled some of my red seam binding and used that to tie the label on. I know if you get these dies,  you will use them all the time! So versatile...a must have!

XL Label Die
Stitched XL Label Die ~ New Release
All Around Christmas Stamp Set
Scallop & Stitched Circle Die

Have fun hopping and be sure to leave comments for your chance to win the goodies! You'll love what  all the other designers have made.....their work is awesome!

Wednesday, November 21, 2012

Custom Luminaries...


Love luminaries! And these are so cute to be able to spell out anything you want. This is going on my mantle for Thanksgiving. It's a great file from My Scrap Chick. Here's how I did mine.

I love autumn and the colors, sounds, and smells. And I love crafting in those colors too!
I used the die from My Creative Time's Piles of Smiles set to cut out the leaves. Accents of twine and crinkle ribbon add to the design.
  
 Here is what my luminaries look like all lit up with the battery operated tea lights. I think it came out looking really nice!
Check out My Scrap Chick to get this file for yourself. They cut out of an 8.5x11 sheet of paper. It's nice to be able to spell out anything you want for any season or occasion 


Monday, November 19, 2012

Cards for Men...


I needed to build up my stash of guy cards. I saw these files in the Silhouette Store and figured they would be great in masculine colors. So....that's exactly what I did. These shades of gray, teal, yellow, and white, work great in my opinion. Fairly simple, yet has a nice designer look to them. And of course the awesome stamps are from My Creative Time.

Hope you like them and come away with some ideas to make guy cards of you own.

Friday, November 16, 2012

Thursday, November 15, 2012

New Release

***BLOG HOP GIVEWAY ALERT***
For our Blog hop giveaway, there will be 2 winners chosen from ALL the comments combined!  You will win a "SURPRISE GIFT BAG FULL OF GOODIES" All you have to do is leave a comment here along w/the rest of the design team's blogs AND also leave a way for us to contact you!  Emma will use random.org to pick the lucky winners!  All you have to do is leave a comment on all blogs in this hop for more chances to win! The deadline is Sunday, November 18th at midnight! EASY PEASY!!! GOOD LUCK!:)

Here's the new, amazing release from Miss Emma at My Creative Time!


As Emma stated in her video on Wednesday, she is offering a free CUTE stamp set "Thank You Hugs" to everyone who places their order by Sunday @ midnite! That will be the deadline to recieve this FREE stamp set! (after that, I will offer it for sale) This is a little token of her appreciation for ALL of you who made this ALL possible for her to continue to do what she LOVES! Also to celebrate our 2 year anniversary! Yep, she came out w/her first set of stamps  2 years ago......WOW! 
This offer starts tomorrow, Thurs Nov 15th @ 8am PST & will end on Sunday, Nov 18th @ midnite! ONE per customer please! You do NOT have to add it to your cart or use a special code, we will just include it w/your order! 
So...let's get to the blog hop!  Don't miss out on anything, and jump to all the blogs, leave some love in the comments, and you will be entered to win! I'm in today's hop, but there is another one on Friday, make sure you get in on that one too!

Here is my project...a little planner to help keep your Christmas organized and things straight in your head...lol. I know I am always forgetting something, so a place to jot everything down seems a good idea. I hope you like it!

I used my Cinch to assemble this little book. And aren't those die cut letters to die for?! I LOVE this new release so much....so many "go to" sets that will always be right at your fingertips.

I created three separate tabs for the most important areas of your holiday, Food, Gifts, and To Do. This is the food tab....hot chocolate....mmmm. And the little circle for all the food goodies that will be made.

And of course the stockings will be hung and filled with little gifts. I cut out the little stockings, colored, and hung on the holly vine. Used a die for the stamped sentiment. All details will be at the end of this post.

And last of all....that list of all that needs to be done. Things to buy, tasks to be done, calls to make....all that sort of stuff. And we all have lots to do, and don't want to forget anything! I used the new label font stamps on this page. I LOVE that set! Trust me when I say, everything in this release is going to be so incredibly useful for almost everything you make. 

Here is my list of the sets used in this project.

My Creative Time
Lower Case Fun Dies ~ New release
Label Font Stamp Set ~ New release
Vintage Stitched Label Die ~ New release
 Scallop & Stitched Circle Die
You Are Perk-fect Stamp Set
Do the Cocoa Motion Stamp Set
All Around Goodies Stamp Set
Warm Holiday Fun Stamp Set
Stitched Oval Die

One other quick little post...a card I made using some from the new release.

I used the alpha die to create the monogram for the front of this card...me..."C"...lol. I cut a couple out of cereal boxes and one out of designer paper so it has good thickness to it. I centered that in my fave scallop set, put that on the new label die, and layered up on the rest of the card. Easy, but I think it looks super cute! Added a few green pearls and a little bow and called this one done! Here's what I used:

My Creative Time
Scallop & Stitched Circle Die
Vintage Label Stamp Set ~ New release
Vintage Stitched Label Die ~ New release
Lower Case Fun Dies ~ New release
Tag Dies

Be sure to hit up all the other designers blogs and leave some love....Emma will draw from these comments for the winners of the give away. Enjoy the hop!

Cheryl ~ that's me!