Friday, May 23, 2014

Thankful...

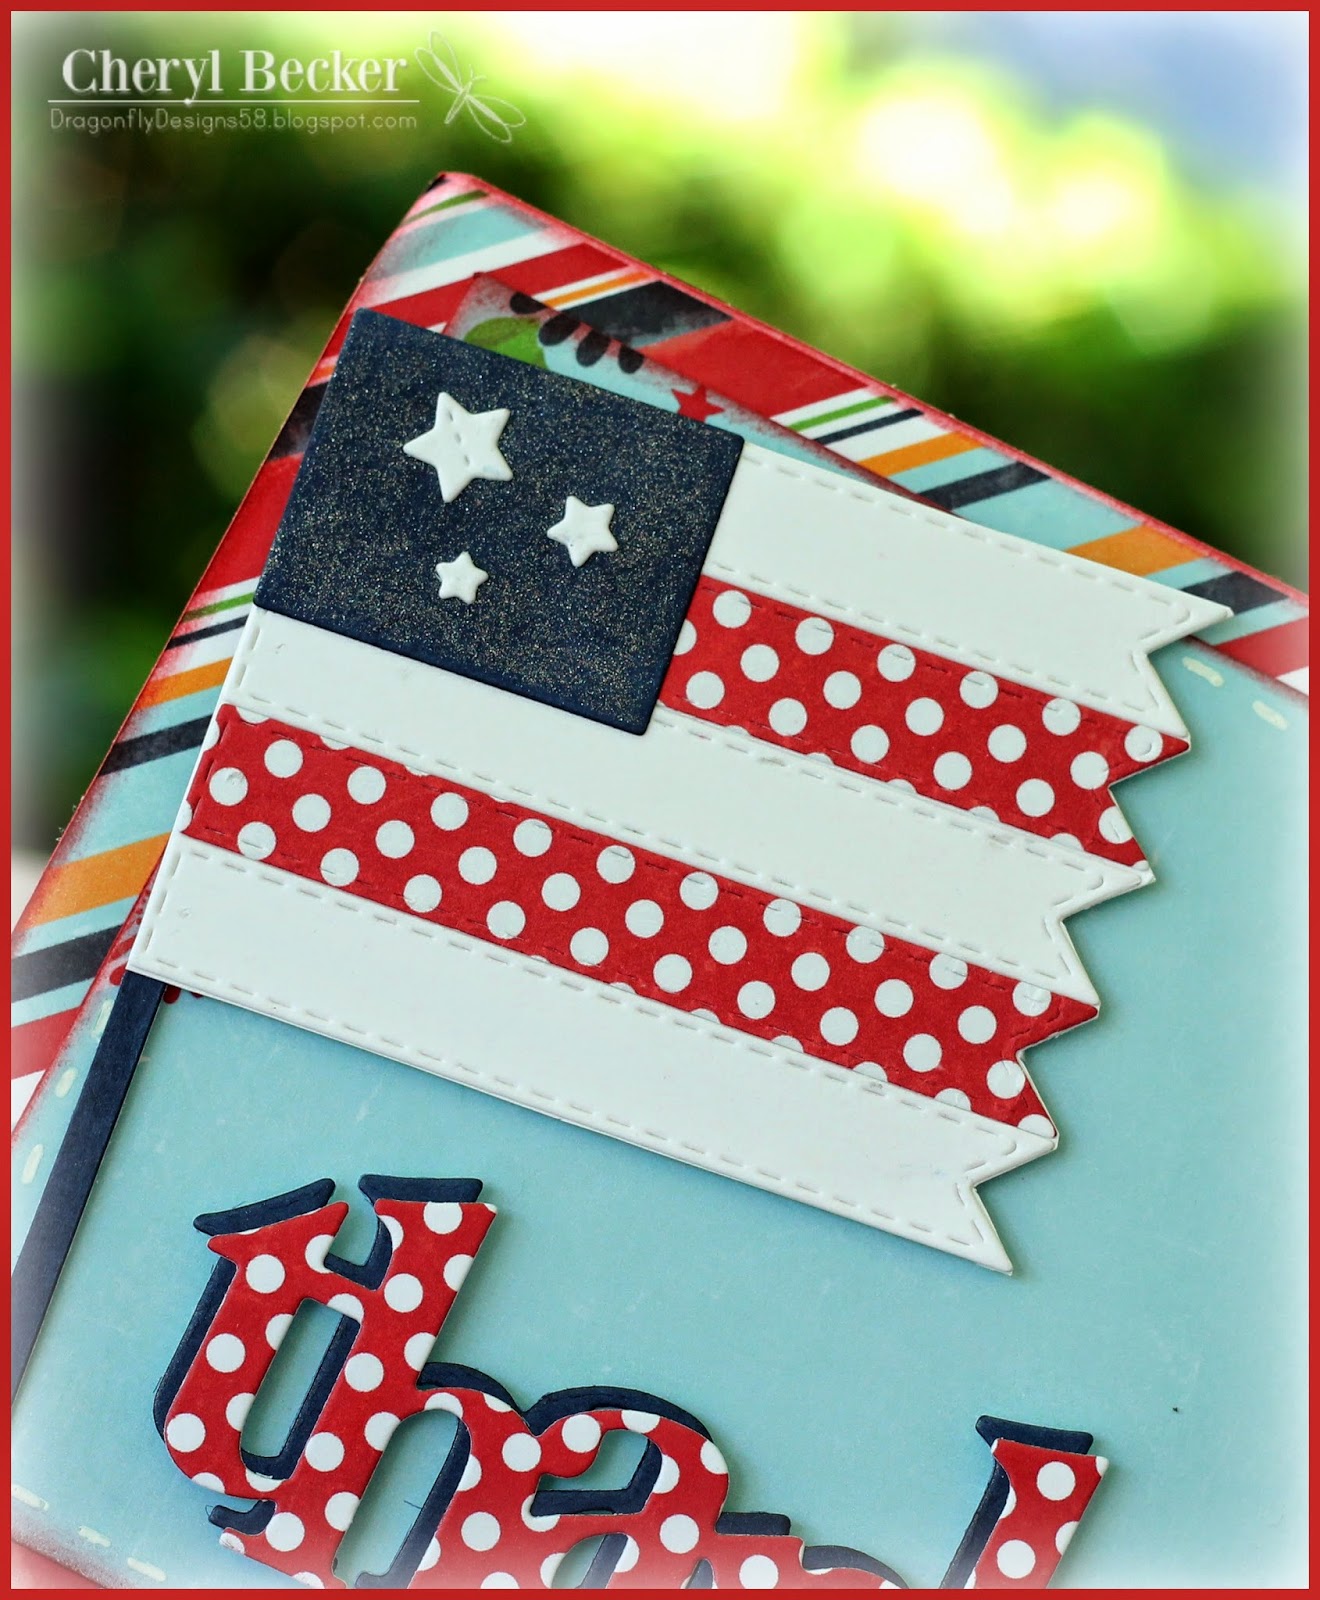
Whipped up a card as I was thinking on this Memorial Day weekend. So very thankful for the service of our men and women who choose to serve and defend our country, so we can continue to enjoy the freedoms we often take for granted.

Used only dies for this card. Take a look.


I used the flag die that is in with the Chocolate Greetings Die set. I cut three in white and two in patterned paper. I glued them side by side and then trimmed out with scissors. I cut a square in navy and added three tiny stars. They come in the 4 x 4 Journal Die & More set.


I cut two larger stars from the 3 Star Stitched Die set and layered them in the corner. I brushed some Wink of Stella glitter on the navy pieces. Wasn't crazy how it shows in the pics, so much prettier in person :(


For the "thankful", I used a die from Paper Trey Ink. I cut two and offset them to create a shadow.

The layered pieces of patterned paper are from Lori Whitlock's Patriotic Picnic paper collection, available in digital format at Jessica Sprague.


Monday, May 19, 2014

Popsicle Time...

Ok, so my grand daughter loves popsicles!!! I mean, loves them! So, I made this little card for her. 
I took one of the phrases from My Scrap Chick and welded two together to create a card. I chose really fun, bright colors and then cut it all out and assembled.


Doesn't this just scream ice cream truck! My little grand babies know that sound and go running! I love this color pallet ~ just in case you didn't know by now ~ lol! Anyway, I created two of the back layer, mirrored one to the left and welded under the pink popsicle. Then it was a matter of picking papers and cutting all the layers. 


I inked the edges a bit and added some gel pen accents and a few pink pearls.


I tied a bow of twine and added it to the orange popsicle.


Also for the center section, inked edges, and added gel pen accents.


For the popsicles, I cut an extra of each color. I added them with some foam adhesive. You can see the other layers were added with some foam tape as well. I like the dimension it gives. 

This is not a big card. It is probably less than 3 inches tall and maybe 5 wide. I think it would be cute tied around a handful of  ice cream treats or tuck in some money for the ice cream truck. Lots of cute things you could do with this. Even invites for an ice cream social.

Here's where you can get your files.


Hope you found a bit of inspiration and have fun crafting!


Friday, May 9, 2014

Vroom Vroom...

A quick card this morning for My Scrap Chick. I looked back through older files and decided on this simple little card. I cut the layers from different papers and assembled the car. I also cut a very tiny oval for a head light and two very tiny rectangles for door handles. For the road, I just cut a black strip and used my white gel pen for the lines in the road.


I also pulled this super cute tree from my stash of MSC files. Cut from patterned paper and added a stitching line around the edge. 


For the sentiment I took one of the chat bubbles and added my text to the center, made sure to center it, and then selected for it to be "no cut". I only had the chat bubble to cut. I also created an offset layer to pop it up a bit. 


I pulled out a few wood accents from my stash. I colored them with a red Copic marker to match the car, brushed on some Wink of Stella and then coated it with Glossy Accents. Also added a bit of that to the head light, door handles, and tire centers. I also did a bit of white gel pen. I used vellum behind the windows.

So, that's it....simple today. Cards don't always have to be elaborate and detailed...esp for a guy! Keep it simple....you know the saying, lol. Anyway, here's where you can get these files. 

Car Album 
(Retired, but you could use any car)

So...I did not realize when I pulled this car out of my stash that it was not in the store any more. I'm so sorry about that. But, you could easily substitute any car you have, or vehicle of any sort really. Get creative, sometimes guy cards can be hard, hope this gives a bit of an idea. 
Happy Crafting!


Wednesday, May 7, 2014

Let's Go Fly A Kite....

I'm not sure why, but I've been on a kite kick this Spring! I just love kites, maybe it's the kid inside, but I want to kite flying! I want to let the grand babies experience it, too! So...I asked FleuretteBloom to design a kite and she came up with a super cute one! Here's what I did with it. Had a hard time keeping the babies off them, so I know will love this little display I made for them.


I made a little display of kites for the kiddos....to me kites scream SPRING! This file is so great! You can use the one with the four panels or the one with the solid background. And throw in some cute clouds with it! 


Here's the one I made for Karson...a bit more boyish colors. So bright and fun!


Here is Miss Aleida's kite. All pink and girly! If you noticed, I tied a bit of twine in bows and added to the kite tail. Every kite needs some cute twine, right?!

Here is a pic of the ones with the solid background.


I added a bit of twine on the orange kite and tied a string to it...that's how a real kite is with it's string coming down to the controller of the kite, lol. Added a touch of glitter to the tails too.


I'm so glad the babies like these. Since I have them every day, I like to have things made for them sometimes, and they can take them home! Love them babies! I chose a butterfly from Fleurette too, and added a couple of those. You must pick up this file....it's adorable!

So, here is where you go to get what you need! 


Why not make some of these to make your space feel like Spring! You could even do them plain white and let the kiddos decorate their own! Great idea, right? Happy Crafting!


Monday, May 5, 2014

Springtime Wreath...

Hey guys! I just got some new goodies from My Creative Time and had to make a wreath with these adorable stamps!

Here it is!


I couldn't stop! I love this new stamp set! I was a florist by trade growing up...my parents owned a flower shop...and I guess my eye for design and color came from that. I cherish that training now, but as a kid I hated to always have to go to work right after school! Anyway, I just kept stamping away till I got the look I was after. Then I cut some of the flower dies and added them, scattered around a bit. Finally, I used that adorable fun size bow die. But I only used the tail pieces. I layered two for the bow part and one for the tails...cut it apart. Scattered a few pearls around, and called it finished.

Not much more to say really...just a simple card but all the stamping makes it look more difficult. Easy peasy!

Here's what I used.


So there it is...super simple but very fresh and classy looking! And very thin for mailing. Get your hands of these...you will love them!!!


Sunday, April 27, 2014

Happy Birthday Cupcake...

How cute is this FREE file...free for awhile, lol....from Fleurette Bloom! Who doesn't love a cute cupcake...and this one is very cute! I like that it is so versatile. You can use or not use whatever layers your want. I chose to not use the top layer of the cupcake paper. Use brights or pastels, you are your own designer.

Here's how I made mine.


I love these bright colors from Doodlebug. They just make me happy! I picked my pattern papers and then chose the solids to match. I welded a shadow layer of the cupcake base to the edge of the card. The length is 11 inches scored at 5.5. Then I put on the stripe paper, assembled the cupcake, and attached with foam adhesive. 


I added the flower on the side and used my white gel pen for some accents. I added a bright pink enamel dot to the center of the flower. Also a bit of inking on the edges.


I wrapped twine around the card and tied a bow. I cut the labels using my dies from My Creative Time and used white embossing powder for the sentiment. Happy Birthday comes from a Simon Says stamp set. I added a few more enamel dots to fill that corner up a bit.

So...there you have it...a super cute, bright and fun birthday card. And it went together so fast! Very fun to make. And you don't have to weld it to the edge, you could just have it hang off a bit. I just liked the shaped edge.

Here's what you need to make this card.


I hope you got a bit of inspiration from my project. Happy crafting!


Monday, April 21, 2014

Special Birthday Door Hanger Box....

I have a DT project for My Scrap Chick today. I always think it's nice to make the birthday really special and fun, especially for a child. This would be so fun for them to wake up to hanging on their door knob or any hook for that matter. I put a few sets together to make it and they will be listed at the bottom.

 I started with the Door Hanger With Pocket file. I used digital papers to fill the images. And they are from the Mary Engelbreit collection. First time using them and they are beautiful! They printed so nice and the colors are so rich. I did not use the pocket part of the file.

For the second set I used, I needed a box that was not so deep. I found the Sweet Nugget Matchbox in the store and it was perfect! I stretched the size of it to fit the size of the hanger tag. If you put both images on your mat, it's pretty easy to keep sizing one till it fits correctly over the other. I find it's easiest to do this when they are not filled, so you only see the lines. 

I needed balloons, and they came from the Tiddly Inks Party Girls set. And lastly, the candles and sentiment came from Cake Easel Card.

So, to start, assemble your door hanger tag. Use whatever papers you'd like. Customize it for any occasion. Next, cut and assemble your Nugget Matchbox. Don't forget you'll need to adhere a piece of acetate to the inside of the nugget box slider so your treats don't all fall out! I get packs of them at office supply stores. Then...just glue down the back of the box to the bottom of the door hanger. All that's left is for you to decorate. This is when you can really personalize your project to occasion, hobby, male/female...anyway you'd like!

And here's mine!


Totally in love with this color pallet!


Check out the sparkle that Wink Of Stella gives!
Tons of things you can put into this little box! Money, gift card, candy, jewelery, small lotions...the sky is the limit!


So, that's it! Cute, right? I love that combing different files together you get a whole new look. And this was super easy to make...a quick go to for a cute little gift. Hope you liked my project for today. Pick up these files and make one of your own.

Happy Crafting!


Thursday, April 17, 2014

You Are Outta This World...

Just a quick card for you today using files from Fleurette Bloom. She came out with a really cute space themed kit the other week, and this is the first I got to play with it a bit. 

I used on the rocket ship file that's in with the card.  I separated out all the different layers. Then I started to fill them with digital files, but wasn't liking it so much. So I looked in the stash or real papers I had on hand. It is a paper pack by Carta Bella called Rough & Tumble. It has a nice vintage feel making this kind of a retro feeling rocket. I love the muted tones.


Told you...it looks retro to me, anyway. I LOVE the kraft paper in this kit. It;s that perfect color of kraft. I wrapped twine around the two top layers, then used foam squares to attach it to the card base. 


Just a closer look at the details of this paper. Also, you pick up on the bit of texture to this paper. If you have never used Carta Bella...you must! It is a VERY heavy weight of cardstock...I love it! The sentiment is from a Peachy Keen stamp set. I'll list it at the bottom of this post.


Even more close up...hard to see, but I added Wink of Stella to the flames, the gap in the dotted paper...that bit of gold, and to the very tiny circles around the windows.

So, for the shopping list...


So, there you have it. A very simple card that would be great for boy or man! Gotta love guy cards!
Head over to Fleurette Bloom and get this file for yourself...super cute 3D stuff in there too!
Happy Crafting everyone!


Sunday, April 13, 2014

Aminal Cuties by Fleurette Bloom...

So...these just came out today and I had to make one! So adorable....these are! I just made a simple card, but these could go on anything! And, of course....the papers are Doodlebug!


How cute is this! So, I chose this polka dot...adore!!! Then selected the stripe and picked solids from AC cardstock to match. The scallop and ovals are in the Silhouette store. I created an offset for the bunny and popped up the rest with dimensional adhesive. I used a Peachy Keen face stamp and the sentiment is from My Creative Time.


Now you have to admit...this is soooo Springy! I love it! I layered the sentiment on green and popped it up with dimensionals. And of course...the white gel pen dots. At the last minute I found these cute glittery dots for the corners. Matched so perfect!

Here's where you need to go shopping!


So, there you have it. You will love all the cuties in this set...will be a must have! Happy Crafting!


Friday, April 11, 2014

Purse Pillow Box...

Here's a bright and cheery pillow box I made for you today. It could be a perfect way to give a few Easter candies to a special someone. Decorate it anyway you'd like. Very versatile!

I used some digital papers from My Scrap Chick by Mary Engelbreit. So very bright and pretty! You need to check them out! The pillow box file is from Fleurette Bloom. She has several styles in this kit to choose from. I know you'll love them!  I have links at the end of this post to help you get these for yourself.


I filled the file with the digital paper and then color coordinated the flowers and leaves to match. I cut several layers of the flowers and backed them in white. Makes them pop a bit more. 


I also created a white circle just a bit larger than the scalloped window. The sentiment is from the Silhouette store. I made a couple layers for that as well. If you look close, you might see a bit of the Wink of Stella glitter. It's on everything except the box of course. 


I got out some of my seem binding ribbon, misted it with water, crinkled it up and then dried with my heat tool. I love the crinkled look of it. Then I used a bit of lime green twine to tie it to the box handle. The color seems off but it really matches perfect. I filled the box with some grass filler, but obviously you'd want to put in some candies or a little gift. 

Pick papers to match the occasion....that's what's nice about these simple boxes. You can decorate them for anything! Party favors, birthdays, thank yous, anything you want. 

So...here's what I used.

Fleurette Bloom


Buds & Blooms...

Yea...I think Spring is finally coming! I am ready for the the pretty flowers, warm weather, and getting these kiddos outside to play! So, in the hopes of Spring here soon, I made a very bright and fun card. 

I used a title from the My Scrap Chick store for my inspiration. I made a shadow of it, welded it to the bottom edge of a card, and then assembled as designed.


I love this paper from Doodlebug, and seem to want to make everything using it! But, hey, it's Spring/Summer anyway. I love the way this came together. I love how the black frames all the brightness going on. 
After welding the shape to the edge of the card, I created two inset layers in Silhouette Studio. One in black and one in green. The card is 5 x 7, so the base layers were sized accordingly.
The black behind the title is the actual file. Then in Silhouette Design Studio again, I created to inset layers. One I cut in white, and the other I cut in the patterned papers.
Once these cuts were all made, it was easy to go in and assemble. 
Before putting the title on, I cut two layers to go behind it. One in black and one it the pretty floral pattern. I centered in left to right, but near the top...didn't want it showing through near the bottom.


I know it doesn't show...hard to capture...but I brushed my Wink of Stella glitter brush over the butterfly, Blooms, and the little flowers. I cut the butterfly file and did the bottom layer in black to keep with the theme. Added some rhinestones to the body and few white gel pen dots. The little flowers are a punch I had on hand and added some enamel dots to the centers. Finished it off with a few more white gel pen accents and popped the two "o's" of Blooms up with foam squares for some dimension.

I hope you like my card I designed for you. You don't always have to use a file for what it may have been designed for. Like this, I welded it and created a card. Let your mind wander and create your own thing. I hope this puts a little bit of Spring into your day. And that it challenges you a bit to use your files in a different way. 

Here's what I used to create this card.


There you have it. Have a great day and happy crafting!


Sunday, April 6, 2014

Go Fly A Kite....

So....I had to make something else with this adorable paper! So I put together a very bright and cheery cards to show you.


I am totally sold on the new Doodlebug collection!!! I LOVE these colors. And picked up the kite flying pack too. Comes with the kites, the tail pieces, and the twine. Not sure why...but I'm LOVING kites these days!


I started by cutting some clouds out of the background piece using My Creative Time dies. I then inlaid, flat to the card base, the white clouds. Then I added the checked piece with dimensional adhesive, to showcase the inlaid clouds. I then cut other out of the patterned paper, inked the edges, and added those with foam tape as well. Then I glued the kites where I wanted them to be. Used a strong adhesive to tack the kite string in a few spots and added the kite tails in various places.  Added some white gel pen accents as well. The grass border is two pieces, one flat down, one on dimensionals.  Finished it off with some sequins and enamel dots. Stamped my sentiment on white, and layered on patterned paper. Added it with foam adhesive as well. A bit of Wink of Stella and called it quits. Hope you like it!

Here's my supply list.


Happy Crafting everyone!


A boy Bunny Top Hat Box....

I couldn't help it...I just had to! Karson needed a boy bunny cause Aleida gets the girl....lol! These are just so easy and so fun to make. Check it out!


Now....this is a cute boy bunny....wouldn't you say?!!! I found some manly papers in my stash and I just had to dress him up. Love these color combos! 


I tied twine on a button and attached to his top hat...has to look manly...lol Did a bit of trimming on his hat. Wanted to keep it a bit less embellished, as it's for a boy. 

Here's your shopping list.


Hope you like! Now...go make one for yourself!


Bunny Top Hat Box....

My Scrap Chick released a super cute bunny box the other day and I couldn't wait to make it! I love this little box...it is so adorable!!! So, here's how I made mine.


I just love this thing! I was so fun to  make and I know I will be making more!!! And, I LOVE the new collections from Doodlebug! These colors are my absolute fave....all time fave! How bright and fun...who wouldn't want to make cute things with these papers?!


Such an adorable face! Get a load of those teeth! Just too cute! I inked the white pieces a bit with blue so they stood out a bit more. Also used foam adhesive for dimension.


I scaled the bird down a bit from the file, just wanted it a bit smaller. I used a stamp from My Creative Time, as well as the Fun Size Bow die. Only the bottom layer, though. Used a bit of white gel pen for some accents. 

So, run...don't walk....over to My Scrap Chick and pick up this new file....it's very easy and so cute! You know you need it, lol! Here's what I used, to make it easy for you to find for yourself.


So...go shop now...lol! Have fun crafting!